So my place has a serious lack of storage and that’s led to a very cluttered entryway. I wanted to add some sort of organization to the space, somewhere to put shoes, hats, gloves and etc. AND I also really wanted to try my hand at building some floating shelves. Two birds one stone right?
It was a match made in heaven.
Before we get into the rest of the post if you havent already, check me out on Instagram! You can find me @zacbuilds or (direct link: https://www.instagram.com/zacbuilds/)
Let’s take a quick tour of the shelves and then we’ll get into how I made them.

You wouldn’t think it, but 6 small shelves actually provides me with a lot of storage. At least enough to de-clutter the space and keep things more civil looking.

I use the bottom 2 shelves for shoes. Originally, I intended on using all of the shelves as one big shoe rack, but once I set it up like that I really didn’t like the look of it. It was just too many shoes. No one should have to look at that many shoes, it isn’t humane.

I started my project here. These are LVL beam offcuts. LVLs are structural beams that are made the same way you make plywood, by laminating many thin layers of wood together. They’re very strong and they also have a really cool texture along their vertical faces where you can see each individual layer of wood.
Calling them LVLs is actually probably a regional thing. I’ve heard people on the west coast call them glue-lam beams. Let me know if you know them by a different name.
I’m doing a major reno (my day job) for a client and these pieces of LVL almost went into the garbage. I rescued them at the last minute from the landfill though. I knew I could make something cool out of them. It took me a few weeks to figure out exactly what I was going to do with them but I got there.
Because I sourced most of my materials from the garbage for this project the only real cost I had was a single gallon of paint. I think in total I spent less than $50 dollars on this project.

I had 6 pieces of LVL and each was a slightly different length. That meant my first job was cutting them down to uniform lengths. As I’m sure you saw in the first few pictures I decided on two different sizes of shelves. The larger shelves are 24″ wide, while the smaller ones are 18″ wide.
I picked the 3 smallest pieces and made a mark on them 18″ from their end and then marked the 3 remaining pieces at 24″.

With the measuring done all I had to do was cut each piece at the sharpy mark. Normally this would be a simple job, unfortunately, I left my big sliding miter saw at a job site. Oh well, I made do with my much smaller miter saw by cutting halfway through each piece, flipping it over and then finishing the cut.

Years of building houses has taught me that no interior (or exterior, for that matter) corner is perfectly square. Before I left the house to start working on this project I made a template of the corner where I was going to install the shelves.
My template was a piece of cardboard that I slowly cut away at until it fit nicely into the corner. I then took that piece of cardboard and traced its edges onto my pieces of LVLs.
I think I goofed and either deleted the pictures of that step from my camera or just never took them. Not sure what happened. So you’ll just have to settle for a picture of lines transcribed onto the LVL. Sorry (I’m so Canadian)!

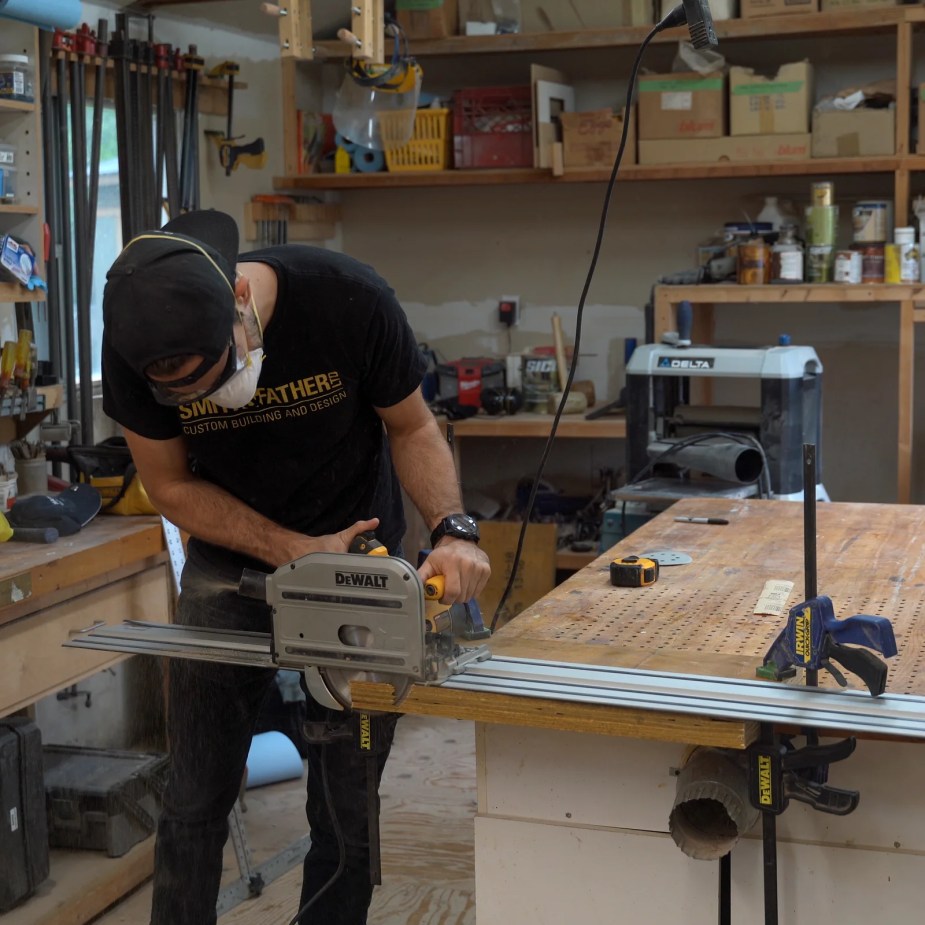
These cuts were a little tricky. We’re talking about tapering 3/16 of an inch across 6 inches or so. Not exactly the type of thing I’d trust myself to do freehand with a jigsaw or a circular saw. Instead, I used my track saw. I really love this tool. It helps me make those precision cuts that I’d never trust myself to do without a guide.
For those of you who are unaware (and don’t feel bad if you are one of them, it’s not a common tool) a track saw is like a circular saw except it comes with a track that the saw attaches to and slides along. It allows you to make perfectly straight cuts, even at odd angles.
Mostly track saws are used for bigger, longer cuts, but it works really well in this application too!
If you were to look at these LVL pieces head on, they’d probably look square. But I took just enough out of them to make them sit nicely in the corner. Had I skipped this step I would’ve had big unsightly gaps between the shelves and the walls.
If anyone reading this is thinking of building something that fits into an interior corner of your house I HIGHLY suggest you template it first. It will make for a far better finish!

When I first started doing this project I knew I wanted to paint the shelves the same colour as my wall so that they would feel like an extension of the wall themselves. That meant I had to paint them white. White isn’t exactly the most interesting choice in the world.
To compensate for my conservative colour choice I decided to get a little funky with their shapes. Each shelf would have its leftmost edge cut at 30-degree angle. To make things EVEN MORE INSANE I elected to alternate the direction of that 30-degree angle between shelves. I know, I’m a total madman.
Just like before I traced my cuts right onto the surface of each shelf and then…

You guessed it, I track sawed these cuts too!
People seem to like it when I talk about what I’m listening to when I’m doing these projects. Those headphones I’m wearing in this photo are actually equipped with a bluetooth headset. I usually listen to audiobooks and podcasts while I’m working.
During this project, I was listening to “The Coddling of the American Mind” by Jonathan Haidt and Greg Lukianoff. It was a really interesting book that explores how a growing culture of “safety-ism” is contributing to a deterioration of western culture. It really struck a chord with me as someone who believes in personal development through challenge and goal setting. It could be a bit dry at times, but overall I thought it was a great read… err.. listen.
If anyone has any audiobook recommendations I’d love to hear them!

After all the track sawing was complete I was left with these 6 shelves. Or at least they would be shelves eventually, I still had a few things left to do on them.
Before we move on to the next step, let’s take a moment and appreciate how cool the cross sections of the LVLs looks. You can see all the different layers of wood that are glued together. This laminate construction is what gives the LVLs their strength.

When you buy LVLs they come coated in a waxy substance that makes them very resistant to moisture and rot. Which is great if you’re using them to build a house, but I was trying to make some shelves.
The wax feels gross on your hands and I suspect it would make the LVLs impossible to paint with any type of conventional paint. From the beginning, I knew I was going to have to find a way to strip it off. I experimented with sanding them and rubbing them down with various abrasives but I wasn’t having any luck. The wax would instantly gunk up any sanding pads I was using.
At a certain point, I said “Screw it! I’m just going to run them through the planner and see what happens”. I was actually pretty worried that the planner might de-laminate the layers of the LVL. To my surprise though the LVLs came out of the planner perfectly smooth and de-waxed. Score!

Did you see that tube connected to my planner in the last photo? I bet you did, you’re pretty observant.
That’s a connection for my dust extractor (read: big vacuum). Doing these projects creates a LOT of dust, and thankfully my dust extractor collects the vast majority of it. I still have to empty it out on a regular basis though. This is what that looks like, pretty crazy right?
I asked my Instagram followers what they all did with their sawdust and many of them suggested using it as mulch in your garden. A few of people even suggested combining it with wet paper, compressing it, and making fire logs out of it. Something I’ll definitely have to try in the future.

Now that my LVLs were all cut and cleaned up I was ready to move onto cutting my mounting system into them.
The mounting system I came up with was pretty basic, but then again I’m pretty basic too so I think it appropriate 🙂
The first step was to cut some channels into the LVLs. I started by marking my channels on the backside of the LVLs. I wanted my channels to be 3/4″ wide and 3/4″ deep.

Over on my table saw I started cutting the channels into the LVLs. Because I wanted the channels to be invisible on the finished shelve I didnt cut them right through to the front of the shelves. I stopped just short of the front of the shelf face. You can see in this picture I actually marked how far I had to push the shelves into the saw blade before stopping with green tape.
Technically, I’m pretty sure this is called a blind dado. Dado is just a fancy woodworker term for channel and they are “blind” because the channel is concealed by stopping short of the face of the shelf.

With the dados done it was time to cut my cleats. Luckily I had a bunch of random off cuts of the LVL that I could use for my cleats. I set my table saw to 3/4″ and ripped off a few pieces.

Then I rotated those pieces and cut them again at 3/4 of an inch. That left me with a bunch of cleats that were 3/4″ x 3/4″, which if you remember was the same dimension as my blind dados.

A quick cut on my miter saw to reduce their length and they were ready for prime time.

See how the cleats fit right into the dados? I know you can’t tell from the pictures, but the cleats fit in there so snug it still warms my heart to think about. Mmm yummy.

Even though I had a nice tight fit on my cleats I still wanted to create a more secure connection. After all, I was going to be putting very valuable stuff on these shelves, like my ratty old sneakers. I didn’t want to play around and half-ass this 🙂
On the bottom side of each shelf, I drilled 5 holes. The plan here is to mount the cleats on the wall. Slide the shelves over the cleats and then screw through the bottom of the shelves and into the cleats to create a nice secure connection.

Alright, all of that building stuff is out of the way. Let’s talk about finishing.
These LVLs are actually really smooth and had very few surface defects after coming out of the planner. Still, I spent a few minutes filling any knots and splits on the surface. I want these shelves to be smooth and flat on the top and bottom.
I didn’t fill any of the gaps on the sides because I was worried I’d ruin the layered texture I worked so hard to keep.

Hey look I changed my hat! Some people might call that a poorly fitting baseball cap, but, to me, it’s a wide angle POV camera setup. I’ve been trying to find a way to get good POV shots for when I’m working in tight spaces and it’s hard to get shots with a normal camera setup. I drilled a hole in the brim of an old hat and screwed a GoPro mount to it. It’s pretty primitive, but with the built-in stabilization of the new GoPros, I’ve actually got some halfway decent footage from it.
Half of the fun of doing these builds is filming them and learning the art of photography and videography. I probably spend equal amounts of time filming and shooting photos as I do woodworking. Before I started sharing my work, I really had no experience with video and very limited experience with photography. It’s been a learning experience, but that’s kind of my jam.

Using some 120 grit sandpaper I “broke” the corners of each shelf. A few passes with a sanding block is enough to slightly round the edges of the shelves. The slightly rounded edges just feel nice in the hand and this process also has the added benefit of removing any loose splinters or frayed edges left over from cutting the shelves.
I do this to basically any freshly cut edge. You’d be surprised how sharp the edges of a piece of wood can get when they are cut by a sharp blade.

Once the wood filler dried I gave all of the shelves a good sand with a random orbital sander. I started with 80 grit sandpaper and slowly worked my way up to 220 grit sandpaper.

My original plan was to “paint” these shelves with an opaque wood stain. I wanted something that was as thin as possible in order to preserve the texture of the wood. However, I got to the paint store and explain my project to the owner and he suggested that I avoid using any product meant for exterior use inside my home. Apparently, the chemicals used to make paint survive exterior conditions are not great to breathe. Go figure. Honestly, I’m still a bit skeptical about this, but I thought I’d play it safe.
The owner of the paint store recommended I use this furniture paint. After I saw a few examples of stuff painted with it I agreed it would work well for this project. He told me to roll it on thin and wait a long time between coats in order to get the best results. Damn! I hate waiting for paint to dry.
Side note: It’s been my experience that people who work at paint stores are wildly knowledgeable. This has held at every paint store I’ve ever been to. They always know pretty much everything about every product they sell. Shout out to all the paint store employees out there!

Rolling on the furniture paint was a breeze. Quick thin coats. This paint actually has a bit of oil in it, so it takes a long time to dry. Which was very annoying for me. I usually like to rush through the painting process as fast as possible because there isn’t much for me to do in between coats.
Another quick tip here: I always wear nitrile gloves when I’m painting. Because A) It keeps paint from getting on my hands (duh!) and B) it keeps my dirty hands from messing up whatever I’m working on. When you’re working in a wood shop your hands tend to get dirty and it’s really easy to transfer that dirt and grime onto whatever you’re working on (especially when it’s white).

With everything painted and finished the next order of business was bringing the shelves home and mounting them.
I mounted the cleats on the wall using a combination of 3″ screws (screwing into studs where I could) and 1 1/2″ screws with metal drywall plugs when I couldn’t get to a stud. Using drywall plugs is never my first choice, but the metal drywall plugs are actually fairly robust and do a good job of support light loads like this. Should hold! (famous last words)
I used my laser level to help with alignment and stud locations. It made installation of these shelves an absolute breeze.

With the cleats in place mounting the shelves at this point was a simple matter of slipping the shelves onto the cleats.
Also, ignore the plaster patches and missing faceplate on the right side of the screen. I was in the process of painting my place when these photos were taken. That stuff has all since been fixed 🙂

I almost forgot the screws on the bottom side of each shelf!
Honestly, these are probably superfluous. The shelves fit so tightly onto the cleats I don’t think they could ever accidentally be knocked off. It would take significant and deliberate force. Oh well, I drilled the holes, so now I’m legally obligated to screw the screws. Can’t hurt to make it more secure!

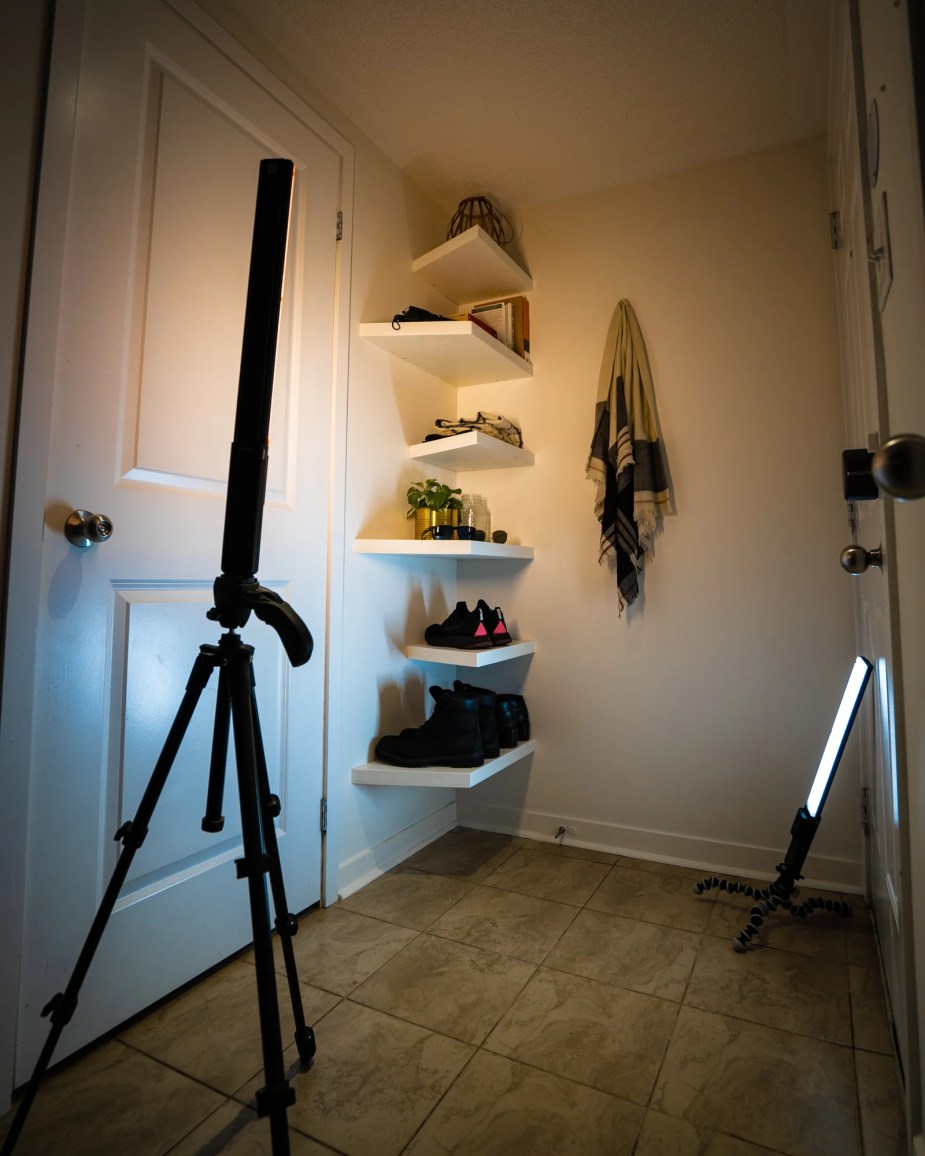
With all six shelves mounted this is what it looked like.
Not bad, but a bit bland if I do say so myself. Let’s populate these shelves and see if it looks any better.

That’s a bit better. It’s a little less boring to look at with some new textures and shapes. I still feel like it’s missing something though. Maybe a bit of colour?

Ahhh ya, now we’re talking. A little bit of colour always makes things look more interesting.

Trying to get good photos of the shelves was actually the hardest part of this project. I did 3 different “photo shoots”. I kept taking my photos, dumping them onto the computer and feeling like they weren’t interesting and they didn’t capture the actual feel of the shelves.
On the third round, I finally got some shots I thought were usable. I ended up buying these two LED lights to add some more layers of colour to the photos which really helped.
Hey, that’s me!
No more audiobooks at this point. When I’m taking photos I usually jam out to some music. I think it helps me take better photos for whatever reason. I’ll usually throw on some Alt R&B or Indie-Electro and get to work.

As you can see the texture on the sides of the shelves is still clearly visible. It doesn’t pop as much as I would’ve liked and honestly, it’s a little hard to see unless you’re a few feet away from the shelves. I still think the opaque stain would’ve worked a bit better, health be damned!

Overall I’m really happy with how this project turned out. I wanted to experiment with shapes and textures while still creating something that was functional. The shelves have definitely helped to declutter my entryway and help it look a little less boring. I’d consider that a win any day of the week.

Alright, that’s it for this build. Congrats if you made it this far! I know it was a lot of photos and a lot of text. Good for you for sticking it out. Thank you for checking out my work!
Let me know what you think in the comments 🙂

awesome job, description, and photos. Thanks for sharing. I don’t have a track saw – wish I did. Again thanks for sharing.
My pleasure Nancy, thank you for the comment 🙂
Do you have a circular saw? You can achieve similar results by using clamping something straight (like a level or a 2×4) to whatever you’re trying to cut and then butting the gaurd of the circular saw against that.