Ok everyone, welcome back to another build guide. This time I’m going to make my own lamp and I’m going to show you how I did it as per usual. The lamp is made of solid mahogany that I had left over from my bookcase project. I can never throw away nice wood so I always try and find projects for my scraps. This is one of those projects.
Not only does the lamp look good (to me at least) but it’s fully voice controlled through my google home setup. It can change colors, come on during certain hours of the day and has a whole range of other functionality I’m still exploring!
Before we get into the rest of the post if you haven’t already, check me out on Instagram! You can find me @zacbuilds or (direct link: https://www.instagram.com/zacbuilds/)

I’ve been wanting a desk lamp for a while that I can hook up to a smart light bulb. I wanted something that I can control with my google home and would integrate easily into my “smart home”. I had been looking for something I could just buy, but didn’t find anything I actually liked enough to spend my hard earned dollars on.
Browsing pinterest one day I came across this lamp: https://img.etsystatic.com/il/0b7012/790597341/il_570xN.790597341_fvdg.jpg
I really liked the look of it and thought I could do my own twist on it so I hit the wood shop and got to work!

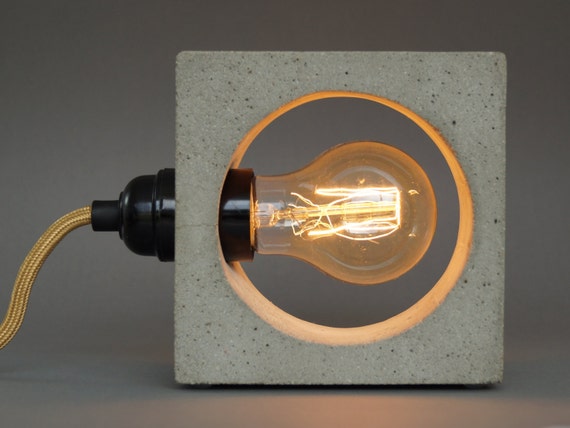
I ended up liking it so much that I made two! Except this one is made of pine and has 100% more sides (actually only 57% more if you count the front, back and inside ring) This one I plan to make a silicon mold of and then cast in concrete, resin and other materials. Keep an eye out for guides on that in the near future!

Outside of the wood I only used off the shelf pieces so if you wanted to recreate this project it would be as easy as possible. Also I only really know how to work with wood 🙂

Ok enough blabbing, let’s get to the build. Here’s the chunk of mahogany that I started with.

I wanted my lamp to be 7″ x 7″ x 4″. Which worked out nicely because I had a 14″ long piece of wood left over that was 2″ thick. Using my miter saw I cut mahogany a couple of times until I was left with….

Two pieces of mahogany that were 7″ x 7″ x 2″. If only I could find a way to combine the two piece of wood into one. Hmmm…

Because the pieces of mahogany I had were actually quite raw and slightly cupped I ran them through a thickness planner to remove the top layer of wood and flatten them out.
This process removed about 1/8″ from the thickness of each piece of wood. I guess I’ll have to settle for a lamp that’s 3 3/4″ thick 🙁

The wood comes out of the planer looking so nice and fresh. I love it. Now that the wood is nice and flat I can finally join the two pieces together.

As you saw in the first couple of pictures the fasteners holding these two pieces of wood together are fully exposed and actually part of the design. This means I had to actually put a little bit of thought into where they were going to be located. I also had to make sure that all of the fasteners were symmetrically located.

I ended up using Headlok screws by Fasten Master. They’re painted black and have a cool torx head. Because the screws are long and going into a relatively dense wood I pre-drilled each screws hole with the pictured drill bit.

I clamped my two pieces of mahogany together after aligning them as best as I could, as you can see in the picture it’s not quite perfect. Don’t worry, I’ll fix that soon.
For now lets just pre-drill our holes. Try and keep the drill bit perpendicular to the block of wood as best you can.

Now it’s time to insert our Headlok screws. I used my impact gun to sink them until the head was flush with the surface. When this step was done I was left with a very solid feeling block of wood.

Now came for the really fun part! I setup my drill press with a 4 3/4 hole saw.
My hole saw wasn’t exactly the sharpest so I can’t really say I cut my way through the block, more like burned my way through it. Oh well, sometimes you have to use the tools you have at your disposal.

See how badly burned the inside of the wood block is here!? I’ll fix that after I give the outside of this wood block a good sand.
Mahogany sands pretty easily. Using my random orbital sander I was able to fix the small alignment issues from before by simply sanding them out of existence. I started with a 80 grit sanding disk and worked my way up to a 180 grit sand paper.
I also used the random orbital sander to round all of the corner and edges ever so slightly.

Ok lets get rid of those unsightly burn marks inside the block. I hadn’t forseen this issue so I didn’t have a good plan for dealing with it going into this build. I thought I was going to have to sand out the burn marks by hand at first, but that quickly proved to be a pain in the ass.
So I came up with this method. I had these sanding drums kicking around from a dremmel set (I think) so I hooked one up to my cordless drill, set the drill to its highest speed and went to town on the inside of the block.
This method still took quite a bit of time, but it was way better than doing it ALL by hand.

That being said, I still had to hand sand the last little bit to make sure everything was smooth. The sanding drum saved some time, but if I wasn’t careful it would’ve been very easy to sand a divot into my block of wood.

The lamp is starting to come together! Now it’s time to locate the hole where the light socket will go. I measured out the exact center of one side of the wood block.

Then I used a 1 1/4″ hole saw combined with my cordless drill to cut a hole through the wood block.
My lightbulb socket has a diameter of exactly 1 1/4″, so it fits snuggling into this hole.

No burn marks on this hole, because I used a hole saw that actually had a few sharp teeth left on it.

Many of you may have noticed that my mahogany didn’t have its rich red signature colour. That’s what this danish oil is for.

I poured the danish oil out onto a rag and then rubbed it into the wood.
The oil will help protect the wood from moisture, but more importantly it brings out the grain and color of the wood. There’s that rich red colour mahogany is so well known for!

Here’s the lightbulb socket and cord I ordered off amazon.ca
I’m a sucker for braided cords and vintage-y looking sockets. Funnily enough it has two power switches, one on the socket itself and one inline in the cord. Since I’ll be using it in my smart home setup, I’ll probably never end up using either of those power switches.

The only other component in this build is this Yeelight smart bulb.
Two thing attracted me to the Yeelight, it’s price and it’s looks. I think the Yeelight is probably the cheapest smart bulb made by a reputable company. I paid $35 for it which is almost half the price of a comparable Philips Hue or LIFX bulb. It’s fully RGB, has its own app, and integrates nicely with Google Home and Amazon Alexa.
Outside of the price, it’s just the best looking (subjective) smart bulb I could find. It’s got a cool grey body and a matte lens.
I’ll do a full review of the Yeelight on my site in the near future.

Test fit time! Yay! Everything fits and it fits well!

After I did the test fit I decided I wanted a second lamp block. So I quickly made this one.
I followed the same procedure as the first, but this time around cut the corners of it off on my miter saw. Stupidly I didn’t photograph this step. Sorry guys.
Let’s take the lamp home and get it setup!

Here it is back on my desk which will be it’s home for the time being. I’ve got a red accent thing going on my desk so I made it red for this photo, but usually I actually have it set as a warm white colour to match the rest of the lights in my room.

The app is not bad, not great, but not bad either. I wish it had more options for day and night cycles. For instance my LIFX smart bulbs have options to change the colour temperature based on the time of day. Nothing like that here. I’ve had it crash on me a couple of times, but the light never stopped functioning. Overall I give it a B-.

My last project got a lot of flak for having a lot of exposed fasteners. That’s ok with me, because personally I like exposed fasteners, but for all the fastener haters out there you can simply rotate the lamp 180 degrees and the fasteners disappear!

I’m still experimenting with different positions and orientations for it. I really can’t decide which one I like best!

Thanks for checking out my build everyone! Feel free to ask me questions or leave your comments below!
I like the exposed fasteners. It gives it an industrial look that is a unique counterpoint to the elegance of the mahogany wood. Beautiful!
Thanks Val! That’s exactly what I was going for, but with my last project not everyone appreciated that design philosophy lol.