This project is the final part of revamping my outdoor area. What a journey. It’s really transformed my outdoor space and collectively it’s only taken me a few days of work. Great return for the effort. This table is pretty basic but I wanted to make it so that a large group of people could all eat outside together. The channel in the middle of the table is design so that it can be filled up with ice and people can put their beer and other drinks in it to be chilled.
I’m really thrilled with how it all turned out. Too bad I’m posting this in November, oh well at least it will be ready for next summer and all the rest of you can have the info so you can start your builds at the first hint of good weather!
So this is everything I needed… or so I thought. I had to run to home depot in the middle of this project and get a few more 5/4 boards.
In total I used:
8 – 2x4x8s
6 – 5/4x6x10s
2 – 5/4x6x12s
2 – 5/4x6x12s
AND
1 custom metal box, more on that in one second.
I didnt have to buy it all, as I had some left over from other projects but it probably cost me about $200 CAD total.

Not many people know this but most roofing supply stores can usually bend and make custom pieces of metal for you out of sheet metal. I took a napkin sketch to my local roofing supply store and they made it up for me in an afternoon.
It cost me a little over 60 dollars CAD. Well worth it. It’s made from Galvanized steel so it’s appropriate for exterior use, it’s roofing sheet metal after all. The steel box is 60 inches long, 4.5″ wide and 4 inches deep. The flanges on all 4 sides are 2 inch wide. I’ll have to make a few modifications to it before it’s ready for ice and drinks, but I think you could probably get a 24 pack in this thing no problem.

Ok time to start cutting. Start by cutting some 2x4s to 15 inches. You’ll need 8 total. Next cut 8 2x4x58″, again you’ll need 8.

Screw them together. This is basically a free hand krieg jig. I pre-drilled the holes with a counter sinking bit. I’ve covered all this in every other part of this build so I’ll skip the detail here.

When you’re done screwing them together you should have something this shape. Got it? Ok cool, now go make 3 more!

Alright, all done! By the 4th one you should be a pro at putting these things together.

Now grab your 5/4 boards and cut 5 to 62″ and 5 to 58″.

The next step will be to rip 1 of each board in half. Well, a little less than half. I made each one 2 1/2″. In order to make these cuts I used a table saw. You could use a jig saw or a circular saw too but it wouldn’t be as clean of a line.

More assembly! You ready? Arrange your 4 frames into a pattern similar to this. You’re outside frames should be 58″ apart, so that your 5/4 boards are flush on the outside edges. The middle two frames should be 4 1/2″ apart. The same dimension as the width of our steel box. Coincidence? I think not.

Screw the rest of the 5/4 boards to the outside frames. Once you’re done both side it should look something like this.
Want to know a secret? I just guessed that the gaps between the boards were the same size. Looks ok though, right?

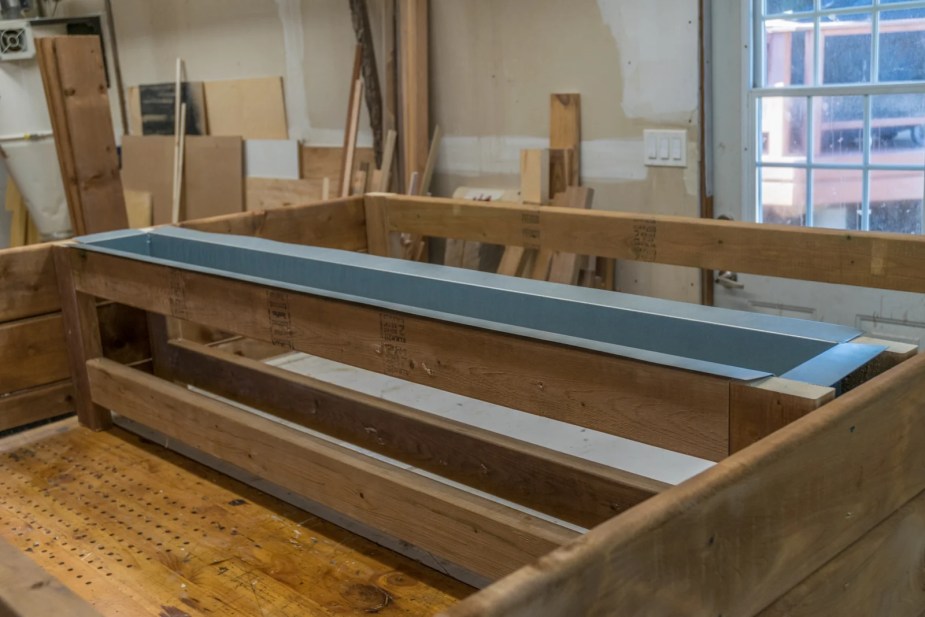
Next I test fit the steel box in between the two frames. It was a tight fit, but it fit. Good. Make sure you center it in the space.
Next I took the 62″ long boards and attached them to the outside, just as I did before. Again, I totally just guessed at the spacing between boards. I’m just crazy like that.

Time to cut and install 2 more boards. These 5/4″ boards are 60″ long. They should span the entire width of the table. If they don’t either you cut them wrong, or I gave you bad instructions. (Hey cut me some slack, I am going based on memory alone here)
Screw them into the frames. You’ll have to screw the flange of the metal box, but don’t worry the screws will go through with a little bit of pressure. It will be easier than you think, I promise, don’t push too hard and over tighten the screws.

Now cut 20 5/4 boards to 27 1/4″. Space them out evenly between your two end boards and screw them down into the frames. Again you’re going to be screwing through the metal flange, but you’ve already done that and you now know how easy it is.
BTW, this is the point where I realized I didn’t have enough wood and had to hop into the truck and go get some more.

About an hour later in this photo. Install in the 27 1/4″ boards on the other side. Make sure you get enough material the first time people. OR, better yet, buy 10% extra in case you screw up.

Almost done! I decided to drill some holes in my metal box. I plan on filling the box with ice and putting drinks in it on warm summer days. Ice melts and makes water. These holes should give that water somewhere to go!

It’s very easy to drill through thin metal. Don’t worry about it if your drill bit isn’t super sharp. Don’t have a drill bit? Forcing a screw through the sheet metal with a drill would probably work just as well.

I did 5 holes all together, spaced evenly along the length of the box.

Next I used the poor mans router (random orbital sander) to round all the edges of the table. This also helps to knock off any splinters that may be left over after all the cuts.

Gotta make sure I get every edge, even the hard to reach ones. My friends are the litigious types, I have to manage my liability.

Nothing too crazy, still has the rustic look, but definitely much nicer on the hands and feet.

Here it is all assembled in the shop! Too bad it’s heavy as balls and there’s no way I’ll be able to get up to my upstairs balcony in one piece.

Broken down into pieces it’s much lighter and easier to move around. Loaded it into the truck and drove it home, to be reassembled.

So I hauled it upstairs in pieces and rebuilt it in its new home. Glad to be done this whole project, but it was a lot of fun. Now hopefully I get a few more warm Toronto fall days to enjoy it before it gets too cold.

I built everything out of pressure treated wood. There’s a few reason I made this choice but it really came down to 2 main factors. First was cost. Pressure treated wood is the cheapest lumber suitable for outdoor use. Second was long term durability. Cedar and many other outdoor woods look like shit after a few years outside. They need to be sanded and re-stained. I’m pretty lazy so that wasn’t going to do. Pressure treated wood will look the same even after many years outside.

I order some cheap lights off amazon.ca to add to the look. They are solar powered, so they charge during the day and come on automatically at night when it gets dark enough.
As always make sure you checkout the other parts to this project:
The Planter Boxes
The Bench
The Loungers
That’s it for the outdoor revamp. Hope you guys enjoyed it and have been inspired to go do your own outdoor space. Leave your questions in the comments!