The Tri-blend Bench
Do you sit on the edge of your bed when you get dressed in the mornings? I used to. I used to struggle to wrench my socks on, getting little to no assistance from my soft, cushy, mattress. Oh, it was horrible I tell you! Practically torture. It was the type of pain that only someone born and bred deep in the comforts of the first world can truly appreciate.
That deep, deep, well of pain and suffering taught me that I needed to change something in my life. Yes, that’s right, I needed a good firm dressing bench in my bedroom. Something I could really leverage myself against while I struggle into my garments. They say necessity is the mother of invention, and in this case, I’d have to agree. So I decided to build one!
Too over the top? Ok, ok, got it. How about this: I wanted to build a bench for my bedroom and I also wanted to use up some wood I had kicking around so I decided to make this bench. Better? It just doesn’t sound as grand when I put it that way 😉
If you want to see how I made this bench scroll on down I’ve got full instructions and tons more pictures. First though, I’d like to give a quick plug for my Instagram account.
I’d love it if you checked out my Instagram page. You can find me @zacbuilds on Instagram (direct link: https://www.instagram.com/zacbuilds/) I post all of my projects on Instagram along with any tips and trick I’ve learned along the way.
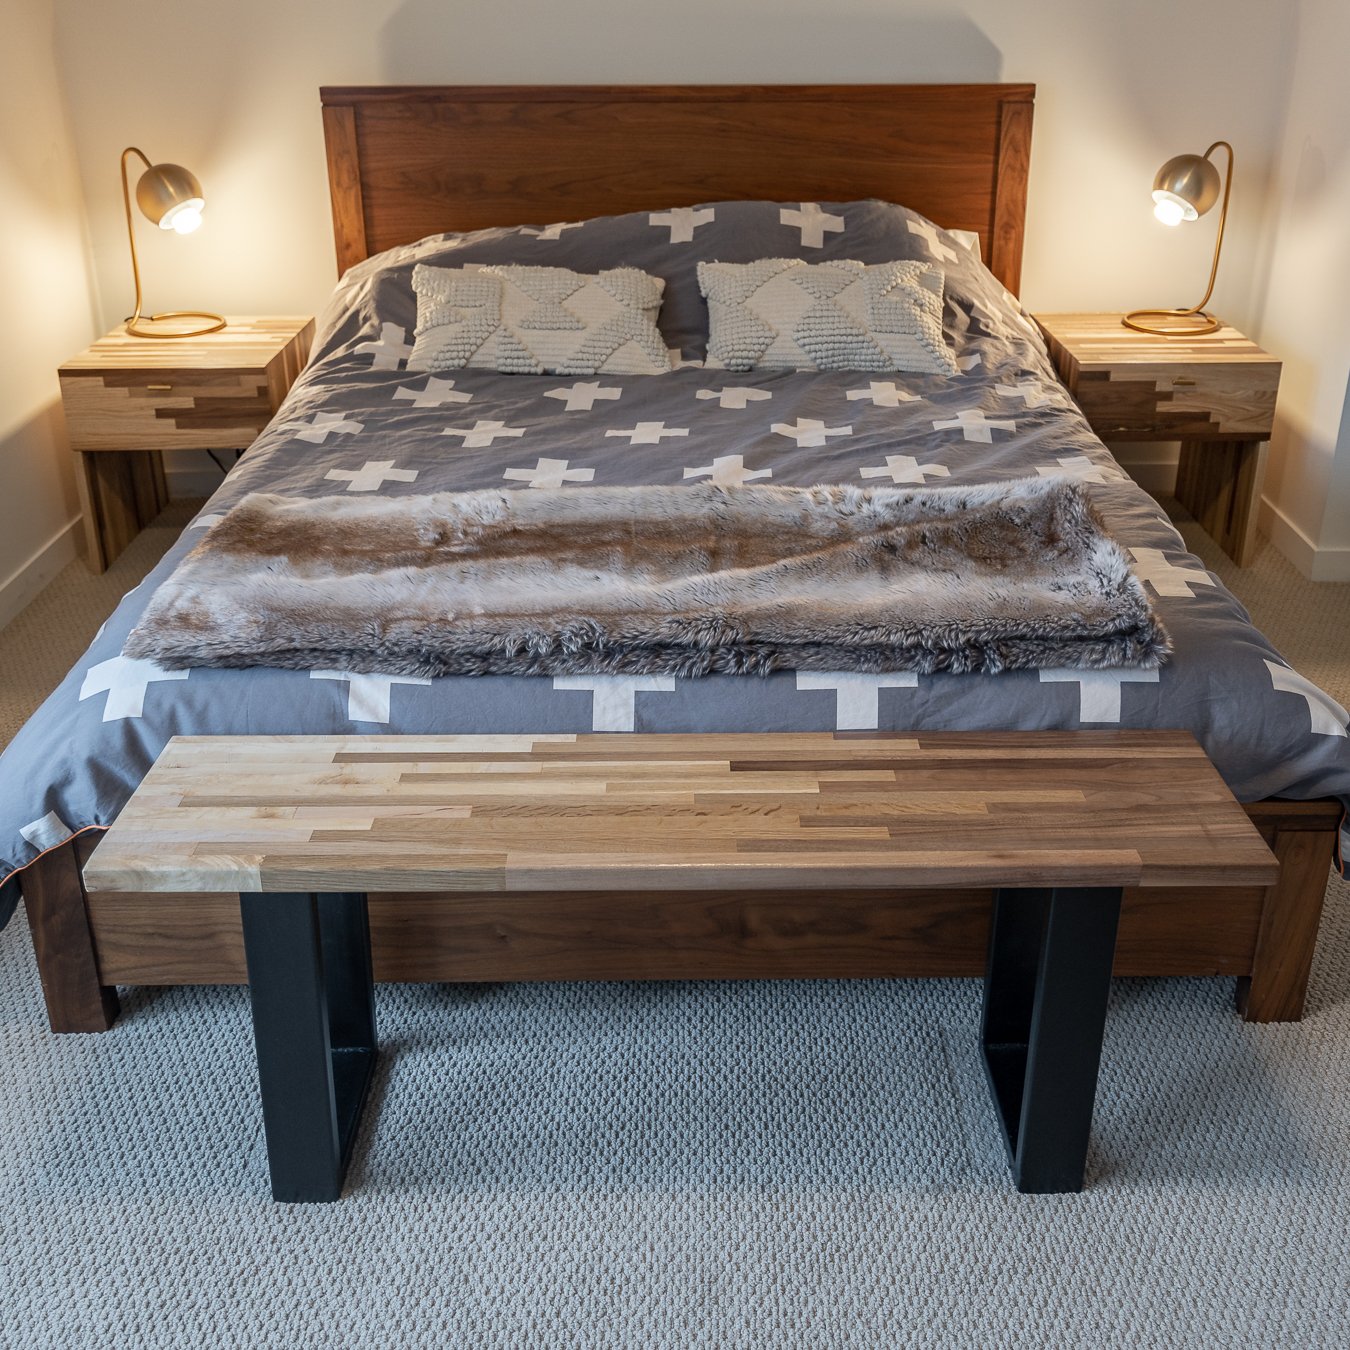
This bench is made of 3 different types of wood.
Starting on the far right we have walnut. I have to say, walnut is probably my favorite type of wood, I use it in a lot of my project. To me its the perfect shade of brown, when I think of the colour of wood I think of walnut. It’s almost always got interesting grain patterns too. It’s really the platonic ideal of what a wood should be haha.
You probably don’t care about the other two “lesser” woods but just in case the middle part is made from white oak and the far left is maple. Let’s be real though, you’re a discerning person, you’re here for the walnut!

It sits 18″ high and is 48″ wide.
The legs are a simple rectangular design, made from 1×3 tubular steel.
I’ve been slowly teaching myself to weld, and these legs were my third welding project. It’s been a lot of fun adding custom metal elements to my woodworking projects.

I’ve done quite a few projects in this same mosaic/butcher’s block/thin strips of wood style. Part of the reason I started doing it was that it allowed me to use a lot of scraps and pieces that I would normally throw away. Which is great because it reduces the amount of garbage I produce (yay for the polar bears!) and reduces the cost of my projects (yay for my wallet!).
For this project, I got most of the materials by breaking down and recycling some of my older projects. Which was great because it reduced the cost of this project to almost nothing! I spent less than $50 on the metal for the legs and a can of spray paint to paint them with. Everything else I already had. If you wanted to recreate this project and didn’t have everything on hand as I did you could expect to pay ~$150.
I used a rubber mallet to smash up all of my old projects. Smashing them, on one hand, was a lot of fun, because who doesn’t enjoy a little bit of cathartic smashing. On the other hand, it was a little sad because I was destroying things I had spent many hours creating.
In the end, I just did what I always do with conflicting feelings, I swept them under the rug and did my best to soldier forward.
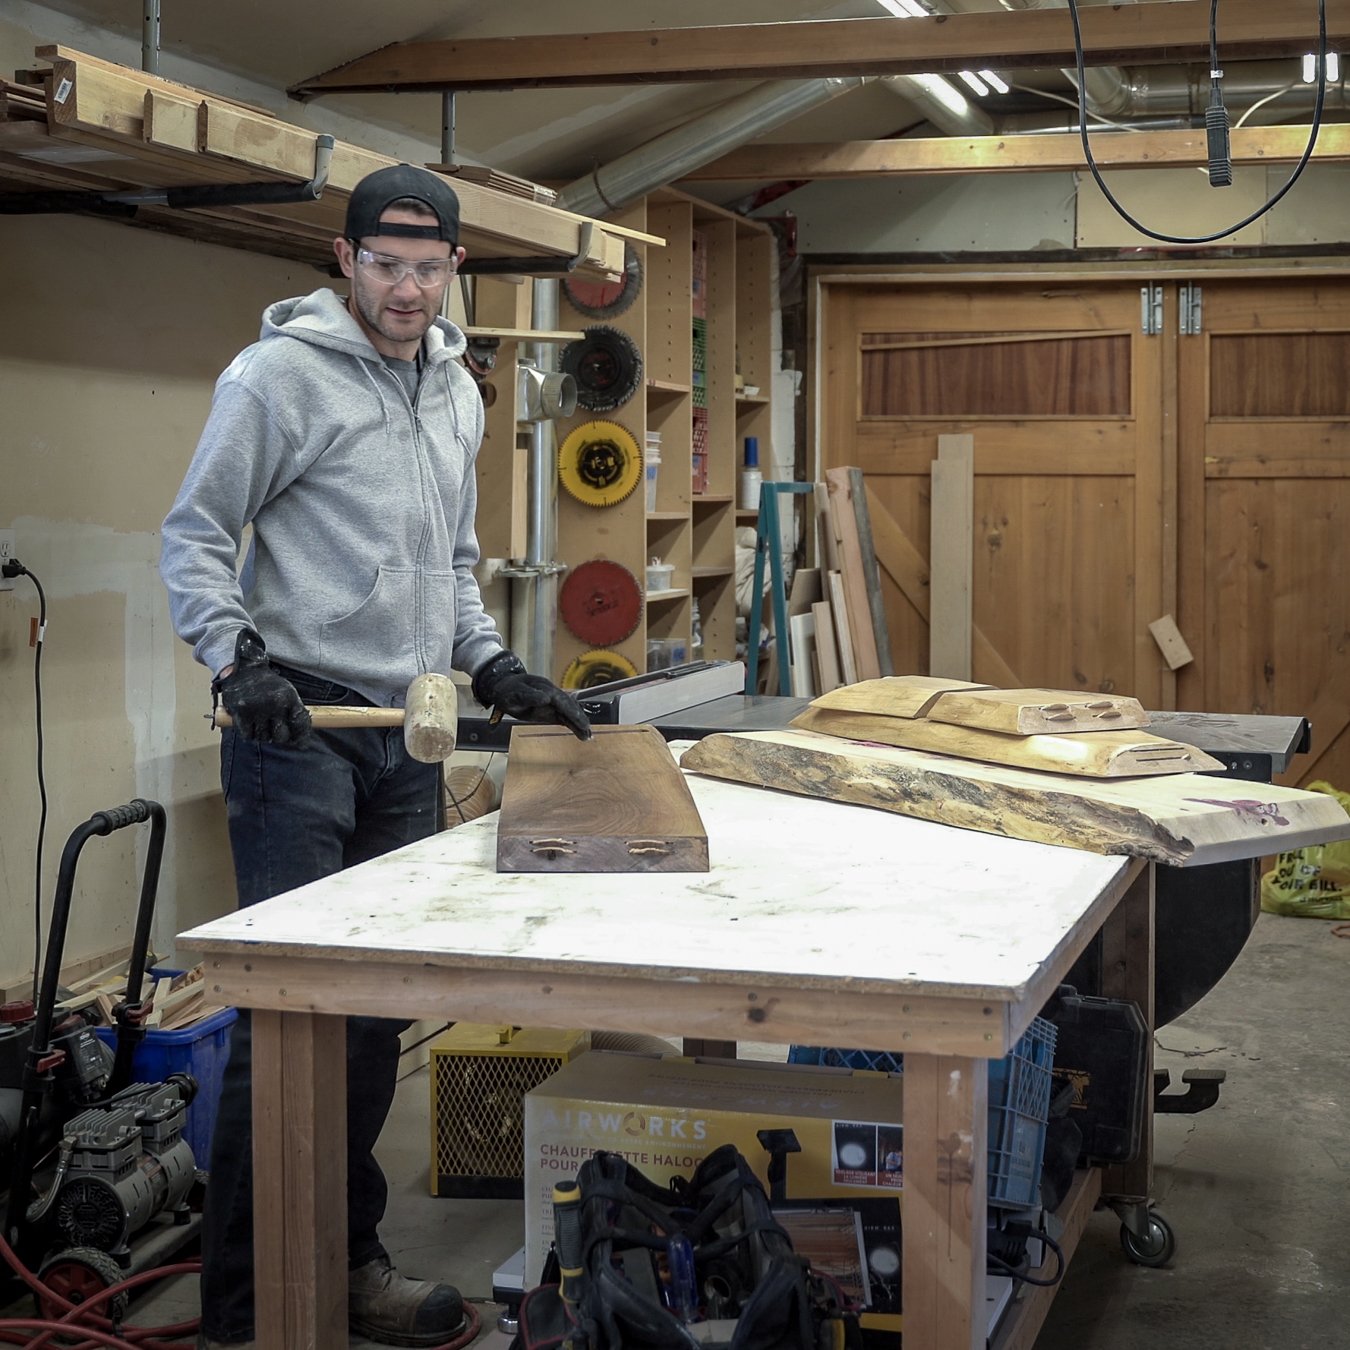
Using my table saw I ripped all of my wood pieces into thin, 1″ wide, strips.
You might be thinking “that’s a lot of walnut for one bench Zac” and you’d be right.
I actually built this bench in parallel with another project. So if you see any pictures where I have way more materials than is necessary for a bench it’s because I was actually working on a coffee table at the same time. If you want, you can check out that build here: Faded Coffee Table

Once all of the wood was cut into thin, 1 inch wide, strips I moved over to my miter saw and started cutting said strips.
The resulting blocks were all random lengths between 6″ and 24″.

Then it was time to arrange all of my blocks into the pattern that you saw in the first few photos. Patterns like that don’t just ‘happen’ they’re the result of minutes, and minutes, of hard work haha.
I really like this part of the project, it’s where I get to exercise the most creativity (outside of the original design work obviously). There’s no perfect pattern, but usually, I’ll spend some time and re-arrange pieces until I find something that I really like.
For this project, the “concept” (that’s really too grandiose of a term, but its all I’ve got) was a gradient fade from the dark walnut to the light maple with the oak acting a sort of middle, and intermediate, step.

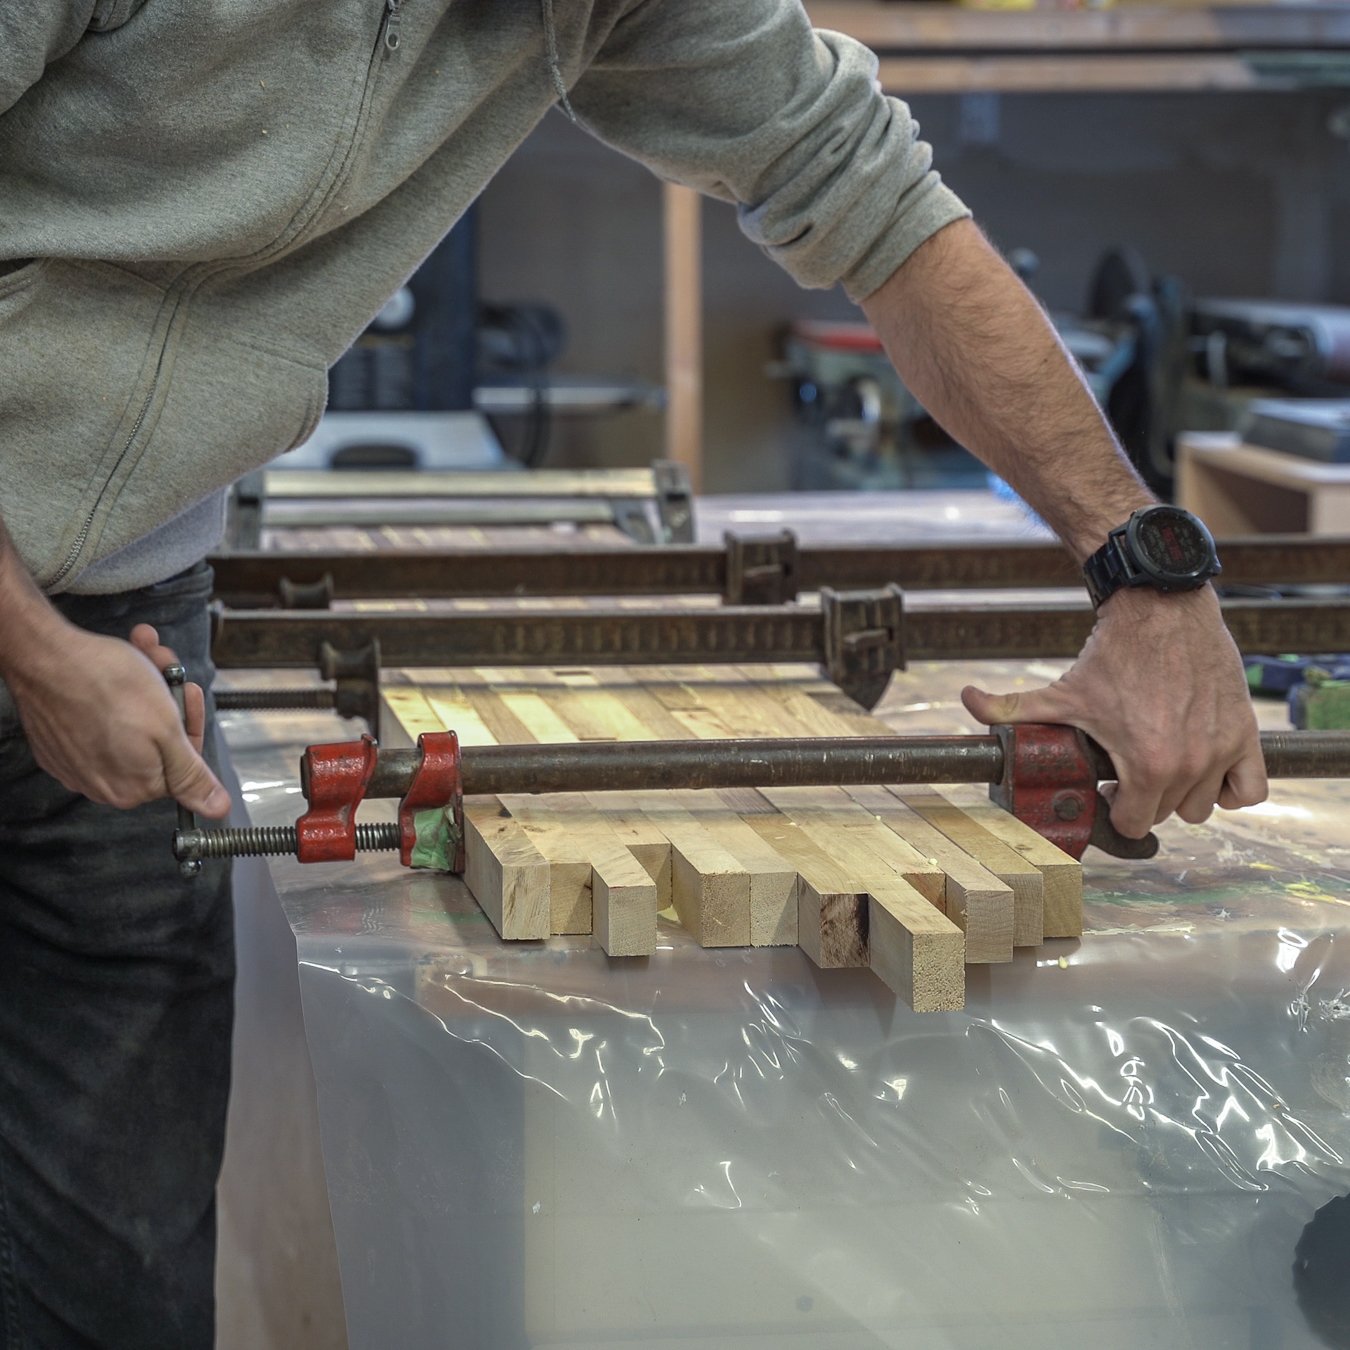
I set my phone to do not disturb mode, cranked some tunes and started applying glue. That’s right, all those pieces of wood are just glued together. Nothing fancy here, I just used regular, off the shelf, carpenters glue.
Did you know that two pieces of wood that have been properly glued together have a stronger bond than the natural internal bonds of the wood itself? Really! Go and try it. Glue two pieces of wood together and then try and split them down the seem. 99% of the time the wood will break somewhere that isn’t the seem where they were glued. Crazy, right? Knowing that I felt confident that I could glue my benchtop together and not use any other fasteners to help hold it together.
Once the glue starts flowing you want to work relatively quickly. You’ve got 20 minutes until the glue starts to dry so it’s a bit of a rush. With a project of this size, there’s no need to panic, but you also don’t want to stop for lunch or take a phone call in the middle of applying the glue.

Hello everyone, my name is Zac and I’m an overtightener. In the past, I’d crank my clamps down until I was blue in the face. I’d pawn my TV, and yours, for just one more turn of the crank. I’ve been clean for a little over a year. Now, I only tighten the clamps until I close all the gaps between the individual blocks and see a little bit of glue squeezing out. Those little glue bubbles are a sign to stop tightening.
So, that’s what I did here. I used my collection of mix-matched bar clamps to force all of my wood blocks together and left the whole sticky mess to dry for a few hours.
Also a quick tip: I cover my work surface in plastic sheeting during this step. It makes cleaning up afterward a lot easier and prevents my glue-ups from bonding themselves to my wood table. I like to use super 6 mil poly wrap, sometimes called vapor barrier. It’s a really heavy and thick plastic, so it won’t stick to the wood and then tear when you try to remove it.
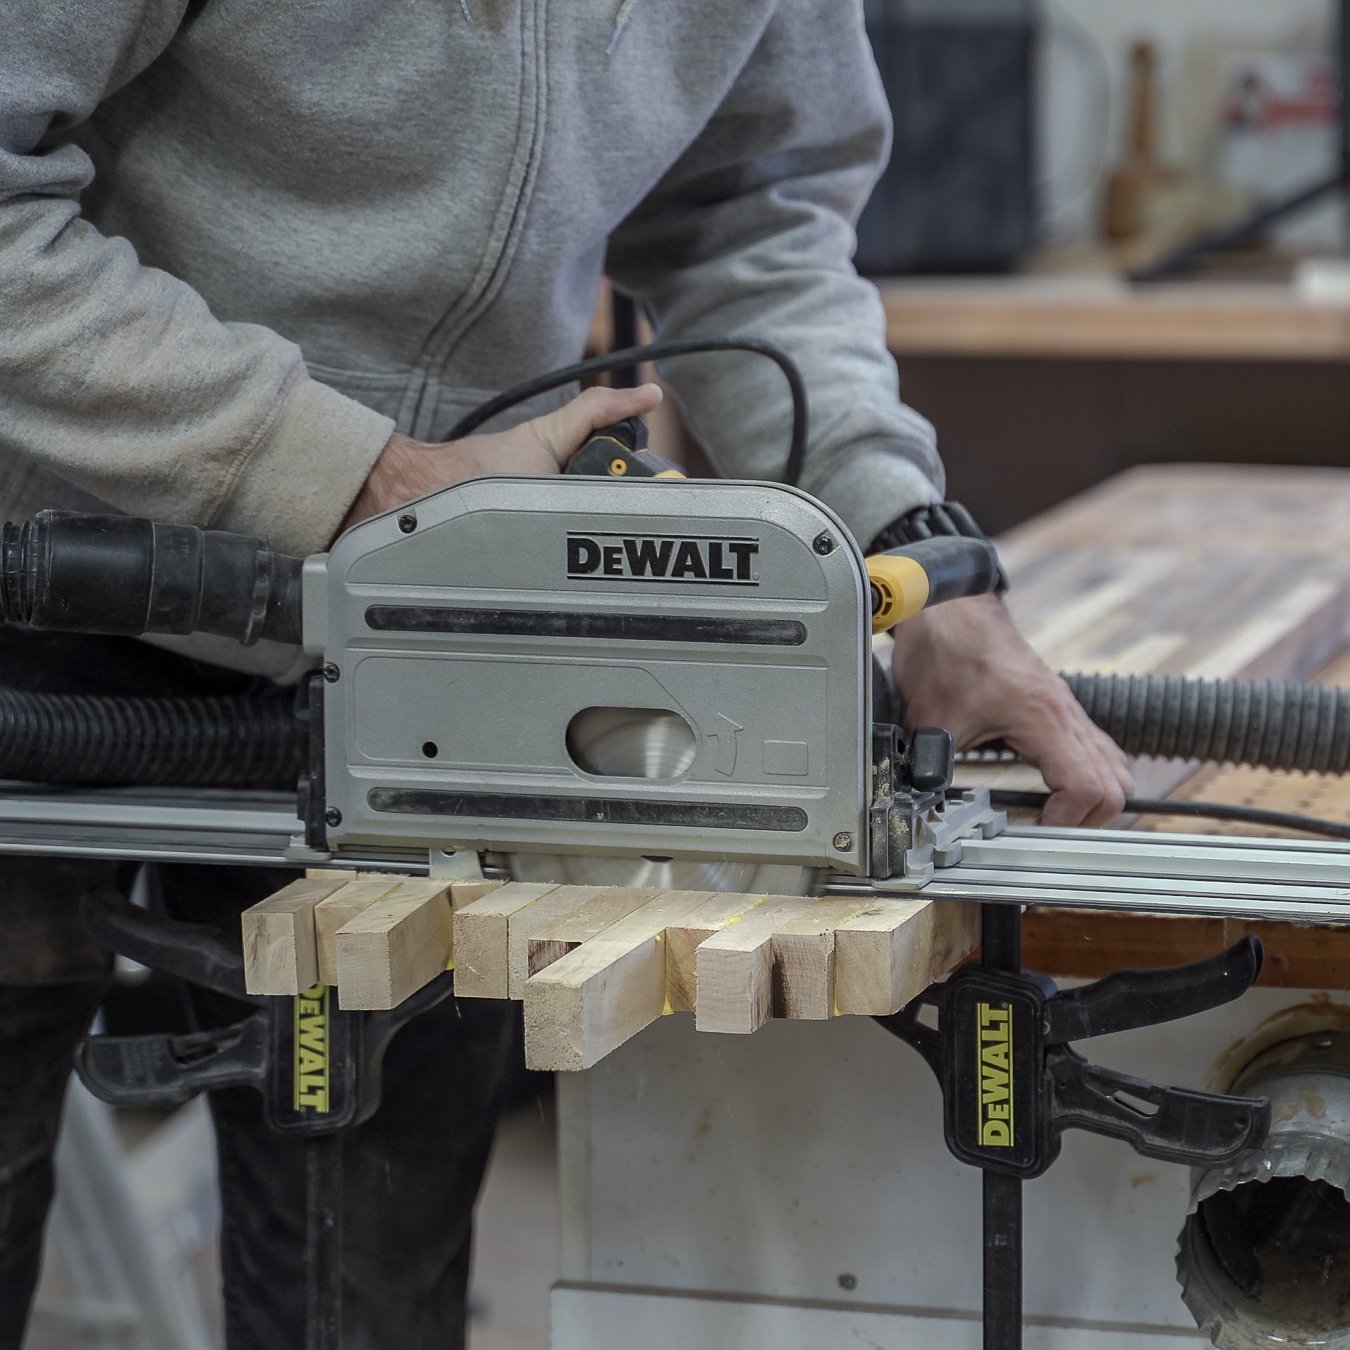
3 hours later and once the glue was set it was time to square up the ends of this benchtop.
Normally I’d do a cut like this on my big sliding miter saw. Unfortunately for me, I left that one at a job site. That’s ok though, my track saw was more than happy to pick up the slack. I’ll look for any excuse to take it out of its case. Basically, it’s a circular saw that rides along a track you can clamp in place, giving you perfectly straight cuts. It’s brilliant in its simplicity and its one of my most used tools.
In some of my previous posts on Reddit, more than a few people have accused me of being a covert Dewalt shill, but there are many companies that make track saws. I just happen to own one made by Dewalt. I’m sure one by any other company would be just as useful.
Unless Dewalt wants to send me a cheque. In that case, I completely retract my previous statement. The Dewalt Track saw is the ONLY track saw anyone should buy 😉
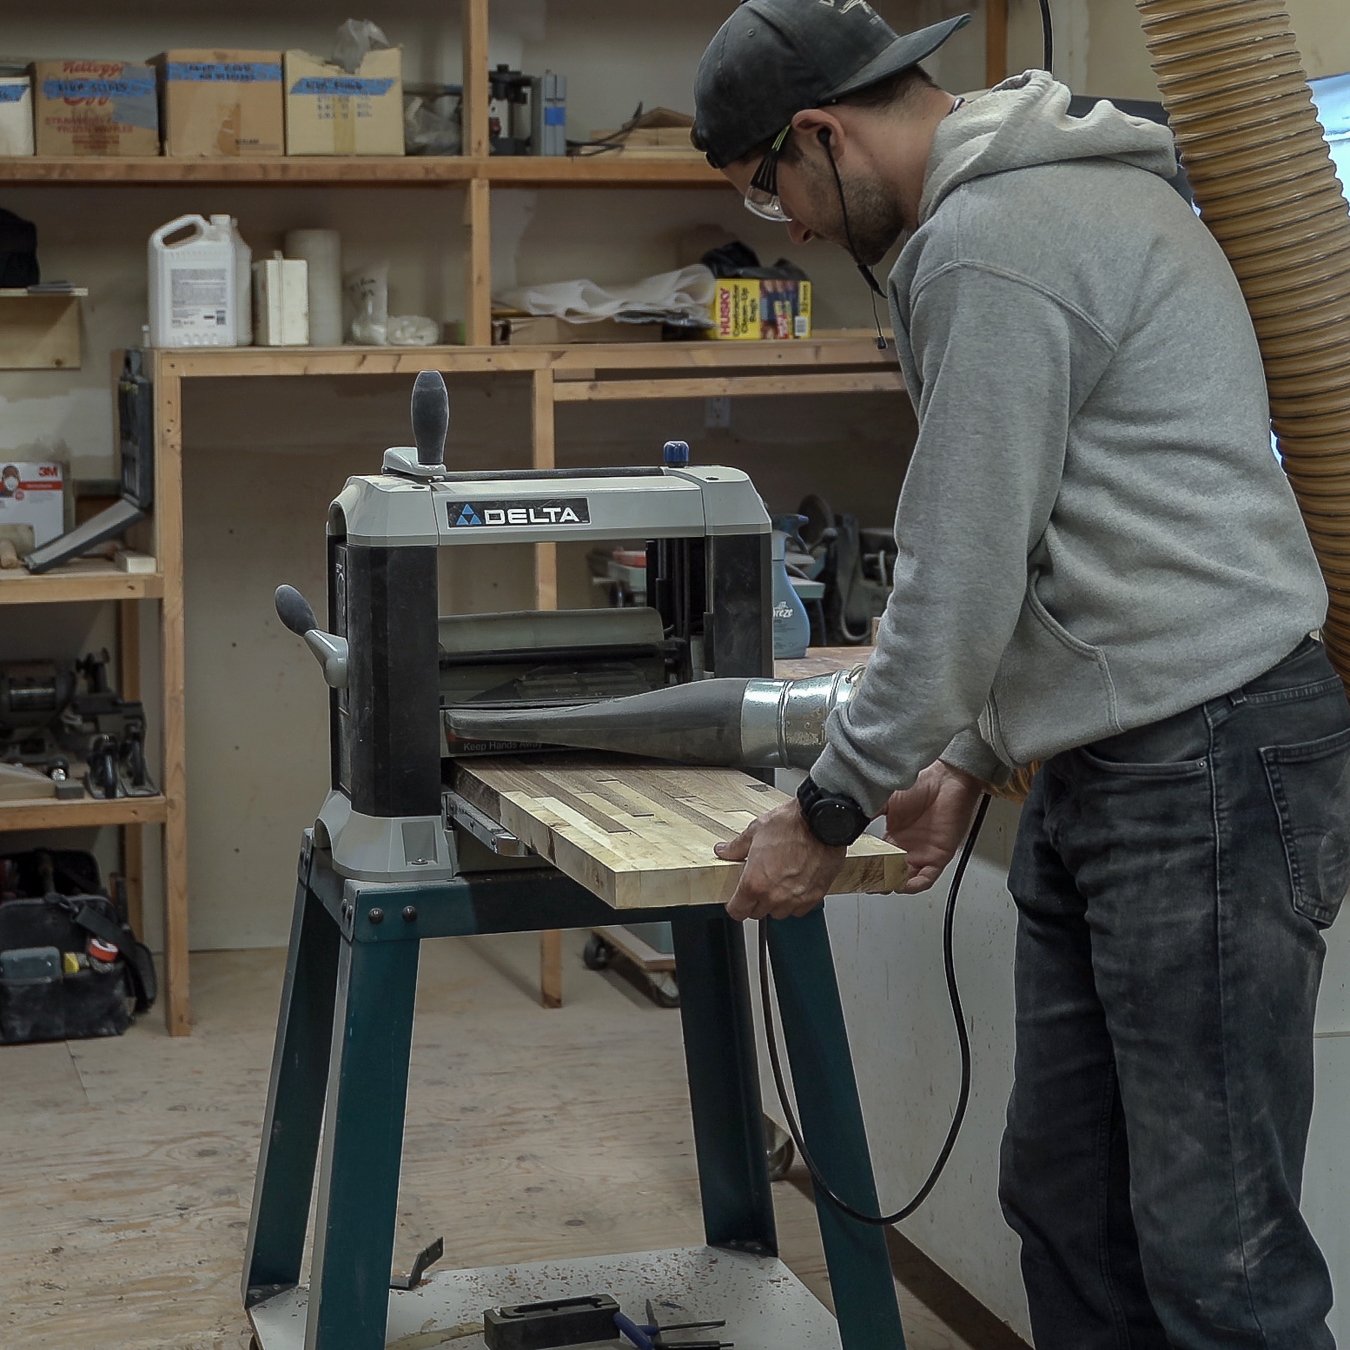
No matter how diligent I am when it comes placing my blocks prior to gluing and clamping them, some will always be a little higher and a little lower than others, creating an uneven, bumpy, surface. My thickness planer will correct that though.
The blades inside the planer remove small fractions of an inch from the highest points on whatever is fed through it. By repeatedly feeding the benchtop through the planer and lowering the blades on each pass I eventually got it nice and flat.
Thankfully I only made my benchtop 12″ wide, my planer is 13″ wide so it JUST fit. Had I made it any bigger I would’ve been doing this by hand with a big block plane, or maybe a belt sander.
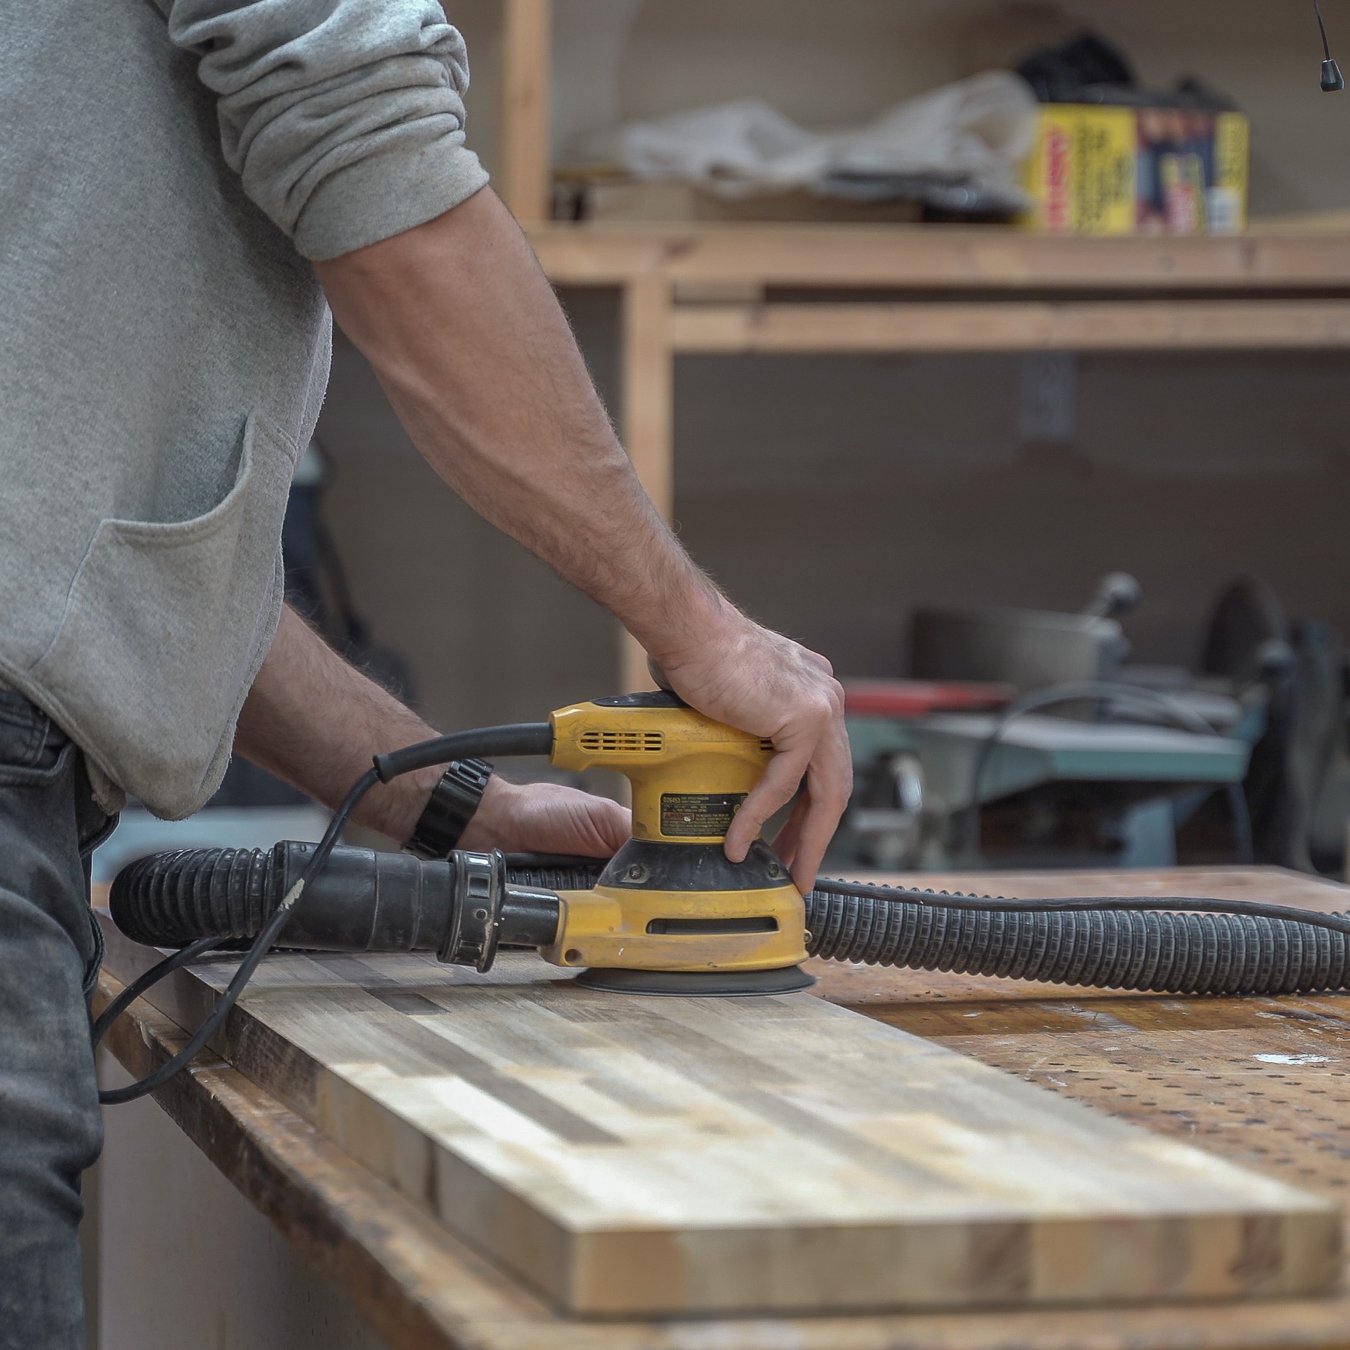
Even though the bench top was now flat, it was a far cry from being smooth. It still had the texture of unfinished wood. Not exactly the texture you’re looking for in something that you plan to use when getting dressed every morning.
To fix that I used my random orbital sander. I gave the whole thing a good sanding, starting with 80 grits sandpaper and progressing all the way up to 220 grit sandpaper.
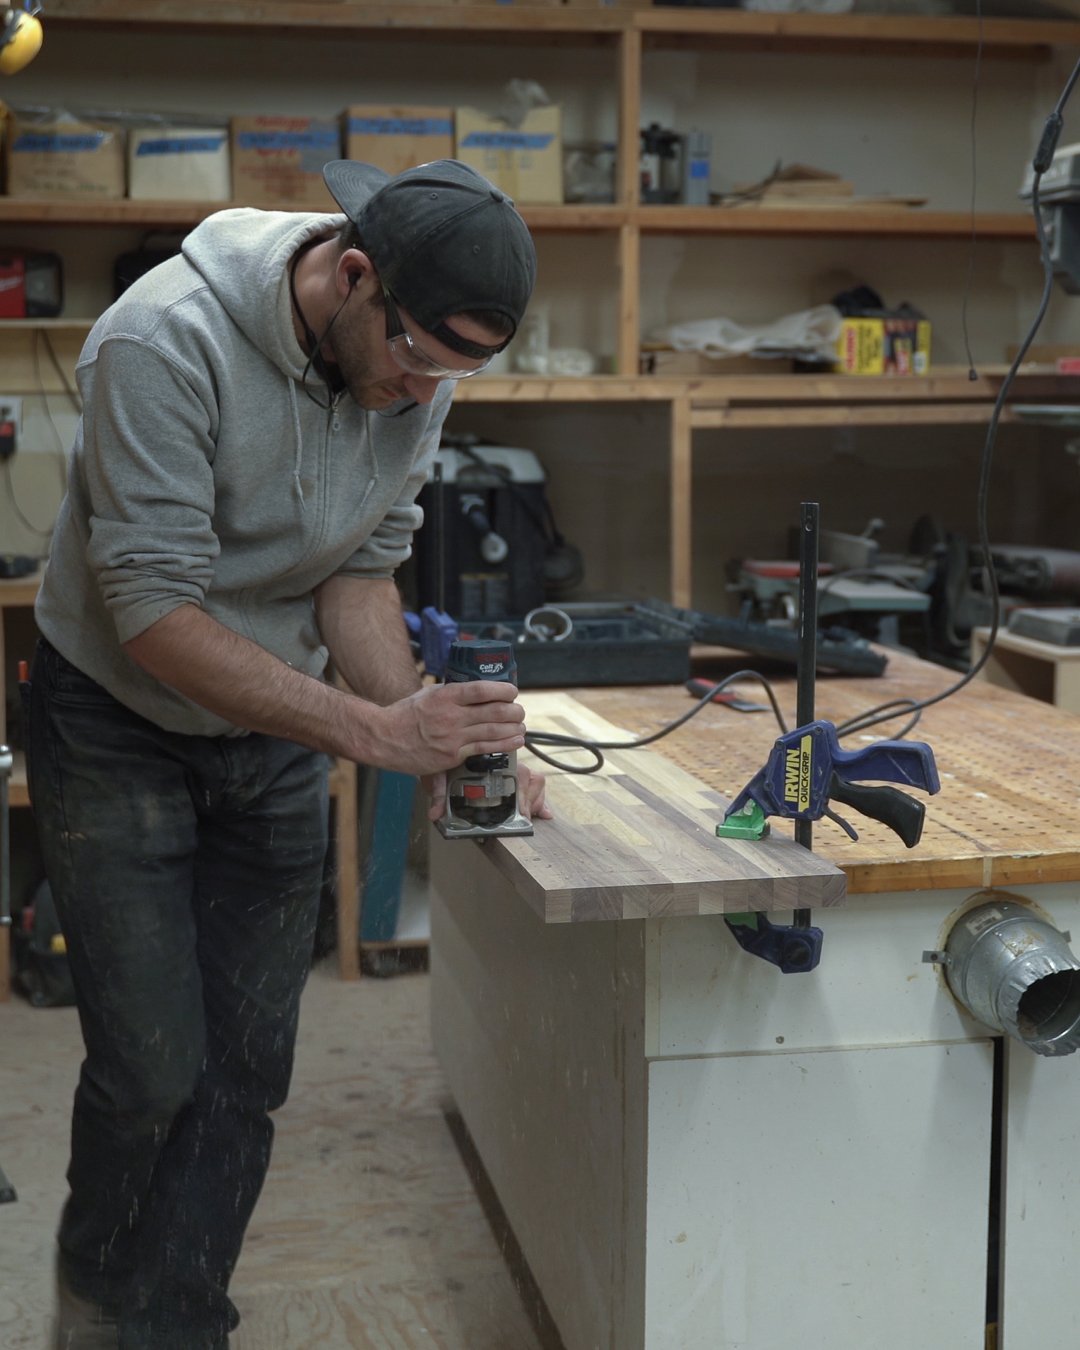
In a similar vein to the last step, I wanted to round the edge of the whole bench to make it more comfortable to sit on. Getting poked in the back of the knee by a sharp edge is not anyone’s idea of a good time. To accomplish this I used a trim router and 1/4″ round over bit.
For some reason, I find it super satisfying to use routers. Something about how fast it can remove material and it always leaves a perfectly shaped edge in its wake. Tracing it around the exterior of the benchtop left a rounded edge with a radius of 1/4″.
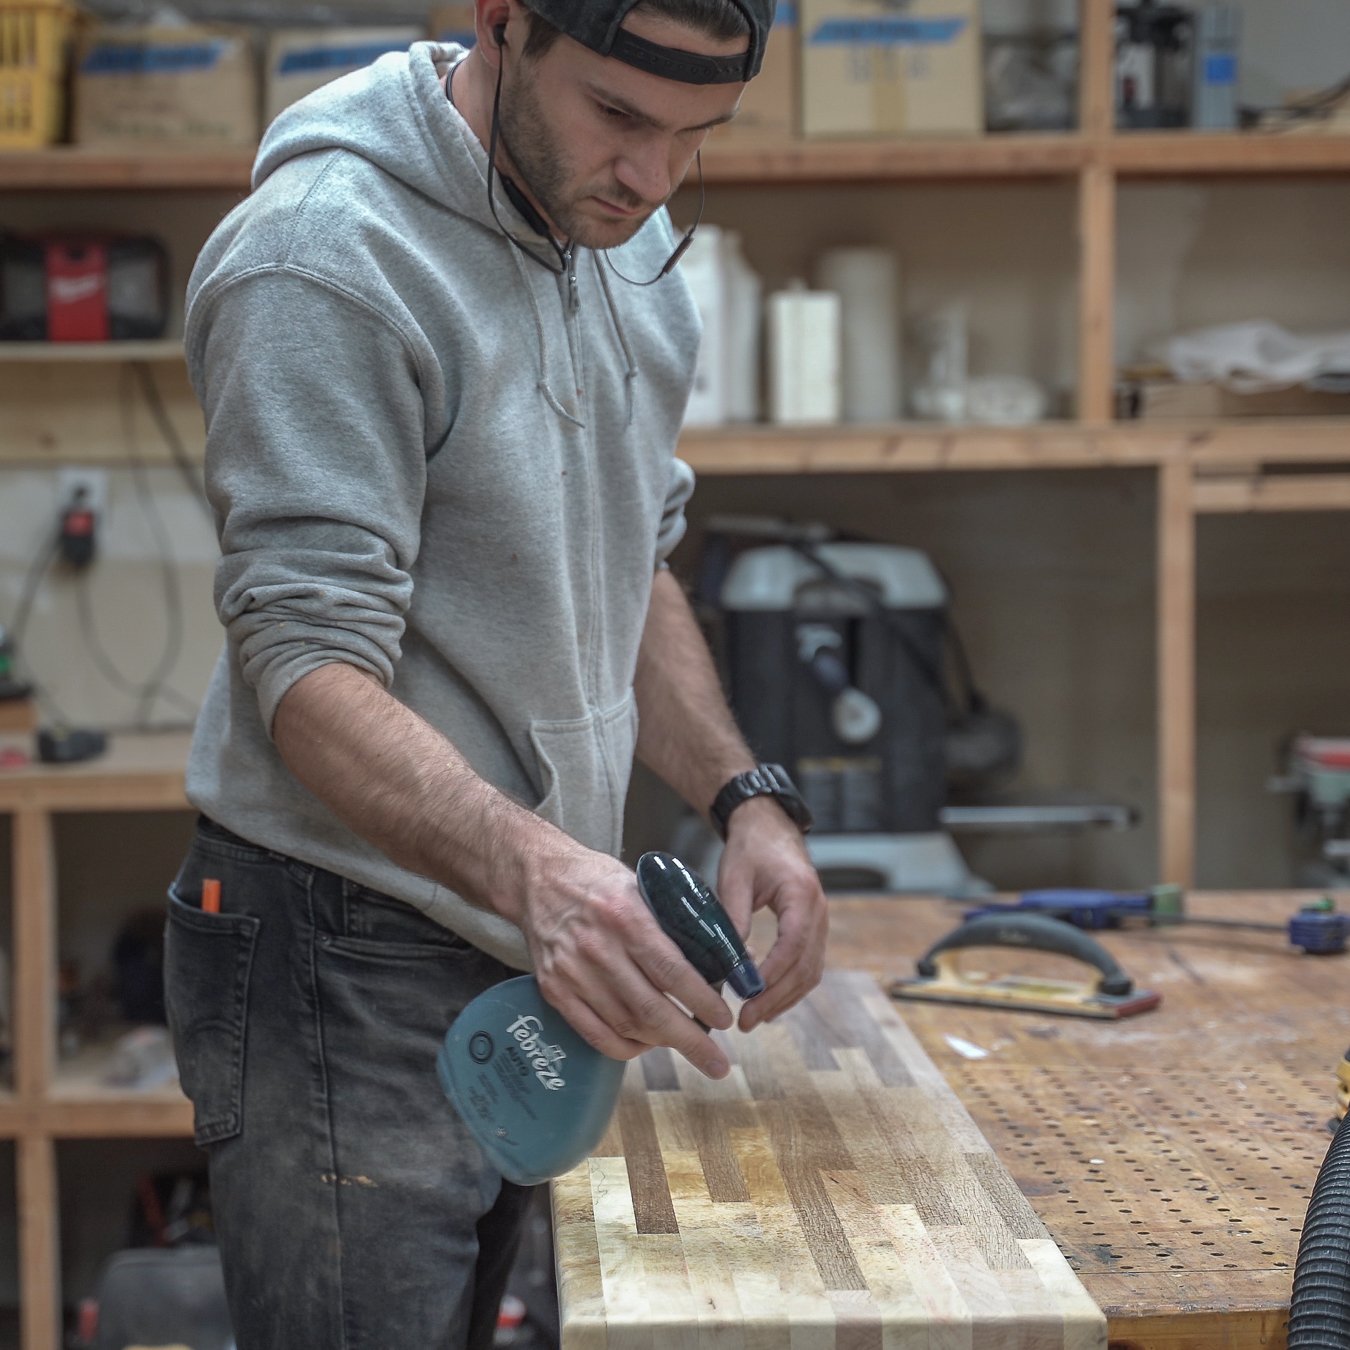
I’ve said it before and I’ll say it again. Raising the grain is a great way to enhance the look, and more so, the feel of your woodworking projects.
What’s raising the grain? Glad you asked. Basically, you spray down your wood with a thin mist of water. Let the wood absorb the water and as it dries any loose wood grains will pop and swell. Once the wood is completely dry again you can sand off all of those popped grains.
What you’re left with is an incredibly smooth surface that feels great. I do it with almost all of my woodworking projects.
Disclaimer: I didn’t actually spray my whole project down with Febreeze, that’s just the only squirt bottle I could find on short notice.
After raising the grain I was ready to roll on some clear coat. Not only does the clear coat leave the wood with that deep, glossy, wet look, but it also helps to seal and protect the wood. It’s a win-win as far as I’m concerned. I did 3 thin coats and sanded with high grit sandpaper between each coat.
The clear coat I used for this project is a satin floor varnish. It’s tough. It’s cheap. It’s easy to apply. It’s win-win-win.
And at the risk of spontaneously breaking out into a DJ Khalid song, I better move on to the next step!

With the benchtop set aside and drying I was ready to start work on the legs.
In total, I cut 8 pieces for my legs, 4 that were 17″ long and 4 that were 10″ long. All 8 pieces had 45-degree angles at each end and the measurements I listed were taken from the long side of each piece.
The first thing I did was cut all the pieces of tubular steel I was going to need using my abrasive chop saw. If you’re thinking about getting into metal fabrication I recommend NOT getting this style of saw haha. It’s loud, it’s dusty and it cuts really slowly. I don’t know what I was thinking when I bought it. I’ve heard people say really good things about metal saws with toothed blades. It seems crazy to me to cut metal with a toothed blade, but apparently, they work really well. I’ll probably be upgrading to one soon.
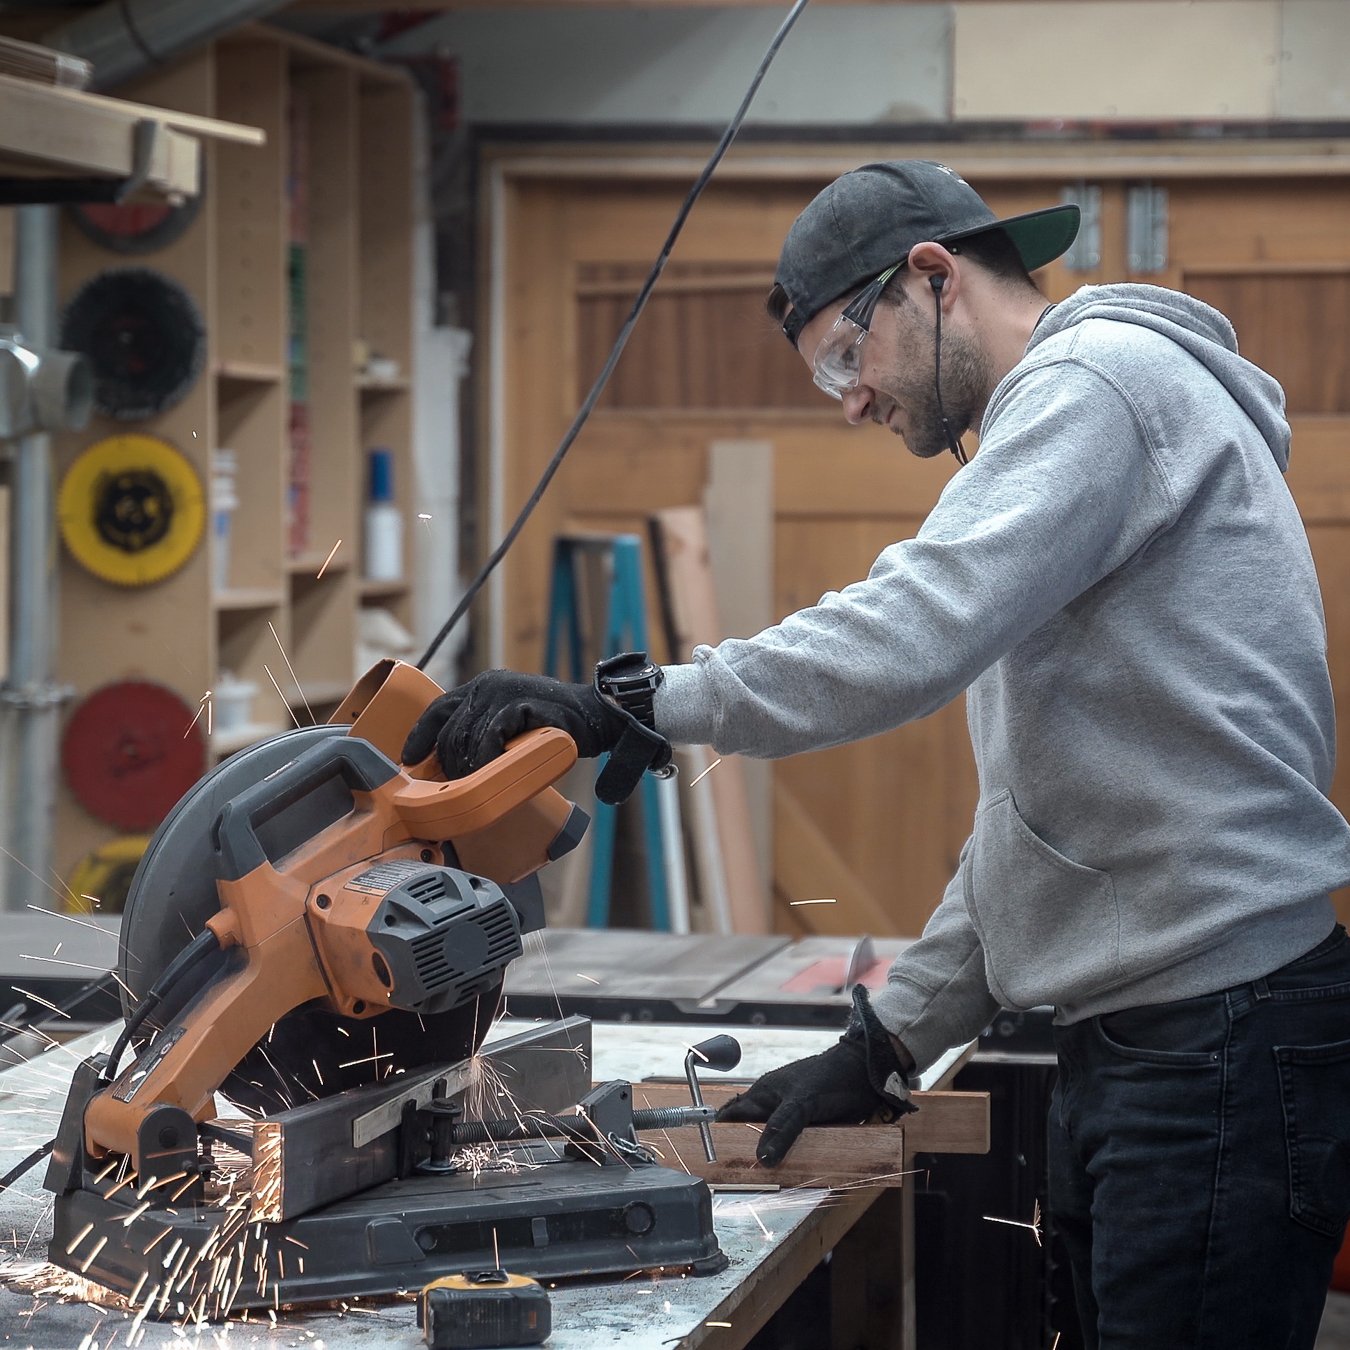
Another downside to that abrasive chop saw is the dirty cuts it leaves. Rough edges, little bits of metal still hanging on, ewww gross. I had to use my angle grinder and a 4″ grinding disk to clean up all of the cuts. Thankfully this was quite easy to do, it took less than 30 seconds of grinding per piece. Plus, who doesn’t love a good shot of the angle grinder throwing sparks?
If Micheal Bay was going to make DIY guides I bet he’d use a lot of angle grinders.
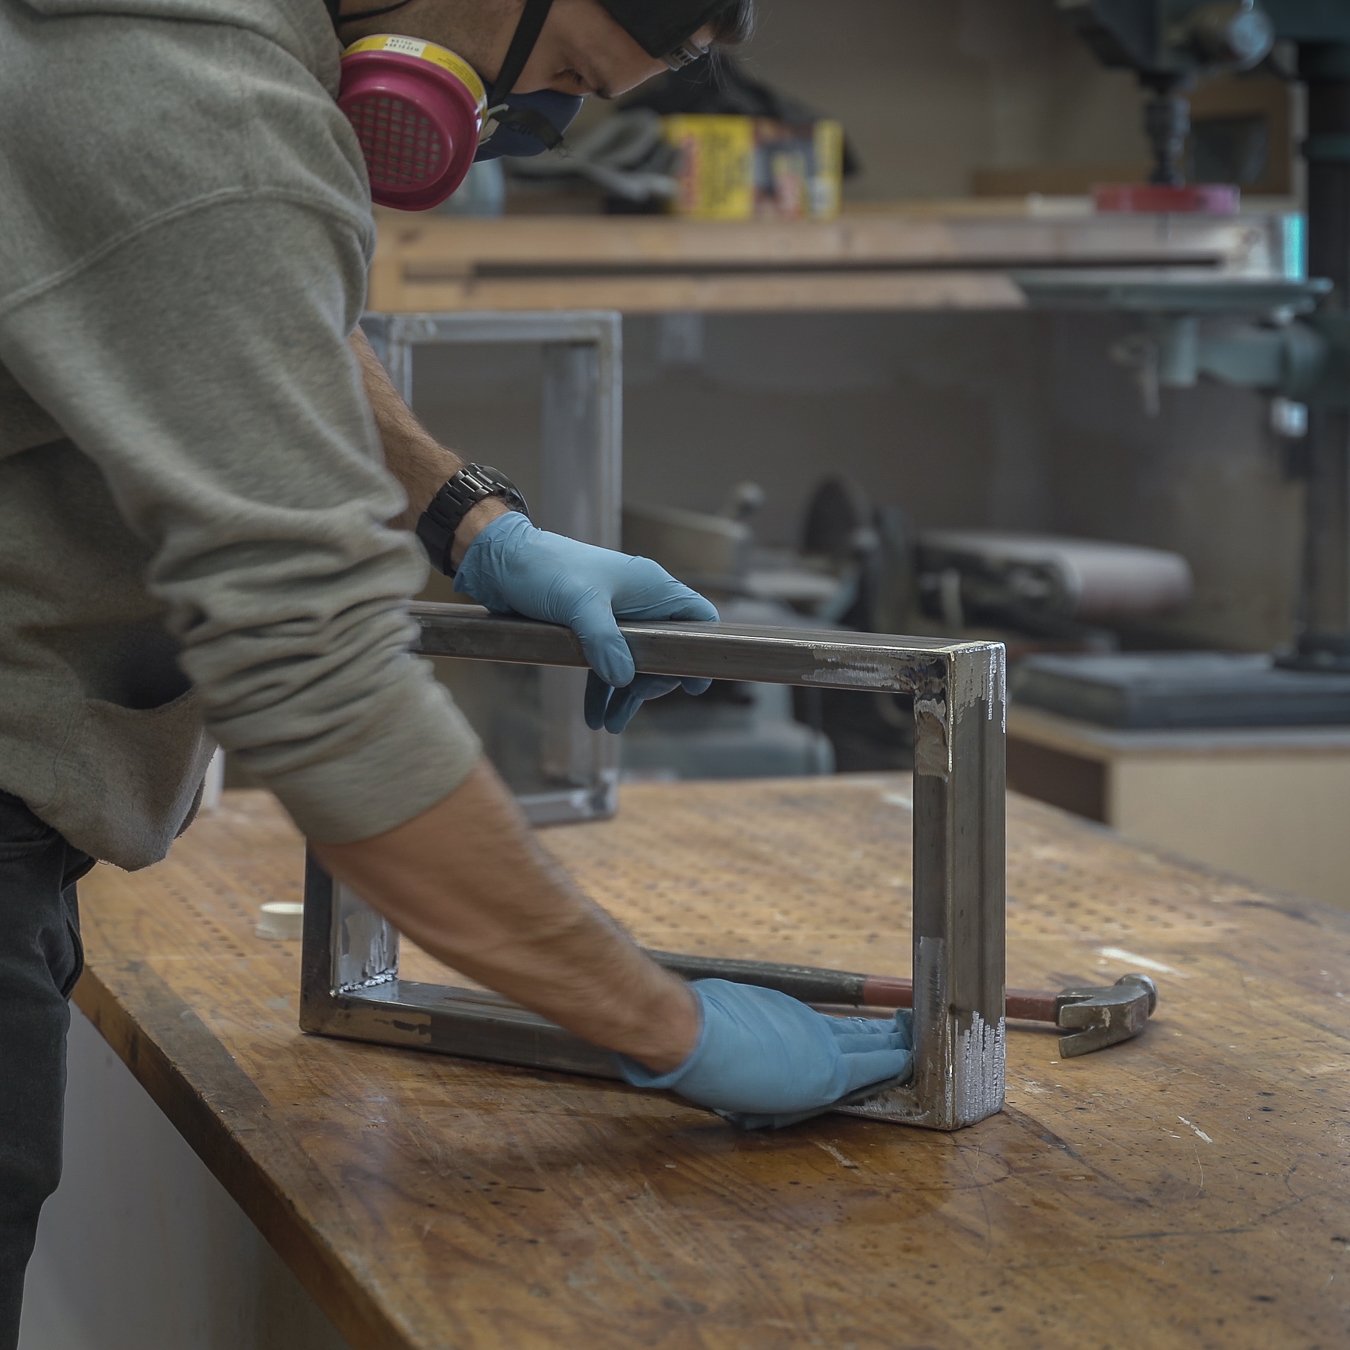
While I was cleaning up the cuts I made sure I gave all of the edges a slight bevel. This is a trick I recently learned that makes welding the seems a little bit easier!

Now I know what you’re thinking. “Welding?! That’s not very DIY!”
To which I’d respond: it’s not as hard as you might think. This was only my third time welding. I’m far from an expert but with a little bit of practice, you can get functional welds that will work no problem for furniture and DIY projects.
I wouldn’t trust myself to weld something like a race car or a bridge, but a bench that only supports my butt 18 inches off the ground? Sure, I’ll roll the dice on something like that.
I clamped the pieces of my legs to the table and tacked them together with a couple of tiny welds at each intersection. I worked slowly and made sure all of my interior corners were exactly 90 degrees with a small square. Once I had all 4 pieces tacked together and was satisfied with the fit I proceeded to fully weld all the seems together.

I’m still a newbie, so my welds were far from perfect. That’s ok though, you can always clean up your welds after the fact. To do it I used that same angle grinder and grinding disk combo that Micheal Bay loves so much.

Have you ever handled bare metal? It often comes coated in a very thin layer of black oil. I think it’s some sort of corrosion inhibitor for shipping. At any rate, it gets all over everything. If you aren’t careful it will stain your hands and clothes black. It also prevents paint from sticking to the steel.
So before painting my legs, I had to strip off all of the oil. To get it off I used some blue shop towels doused in varsol/mineral spirits. It comes off really easily, just a quick wipe down is all you need.
This is a step I really should’ve done before I even cut the metal, but, better late than never (which is coincidentally also what I said at my university graduation ceremony). As I was cutting the metal and welding it back together I was burning off the oil and releasing nasty fumes into my workshop. So ya, don’t be dumb like me, remove the oil before you start working with it!
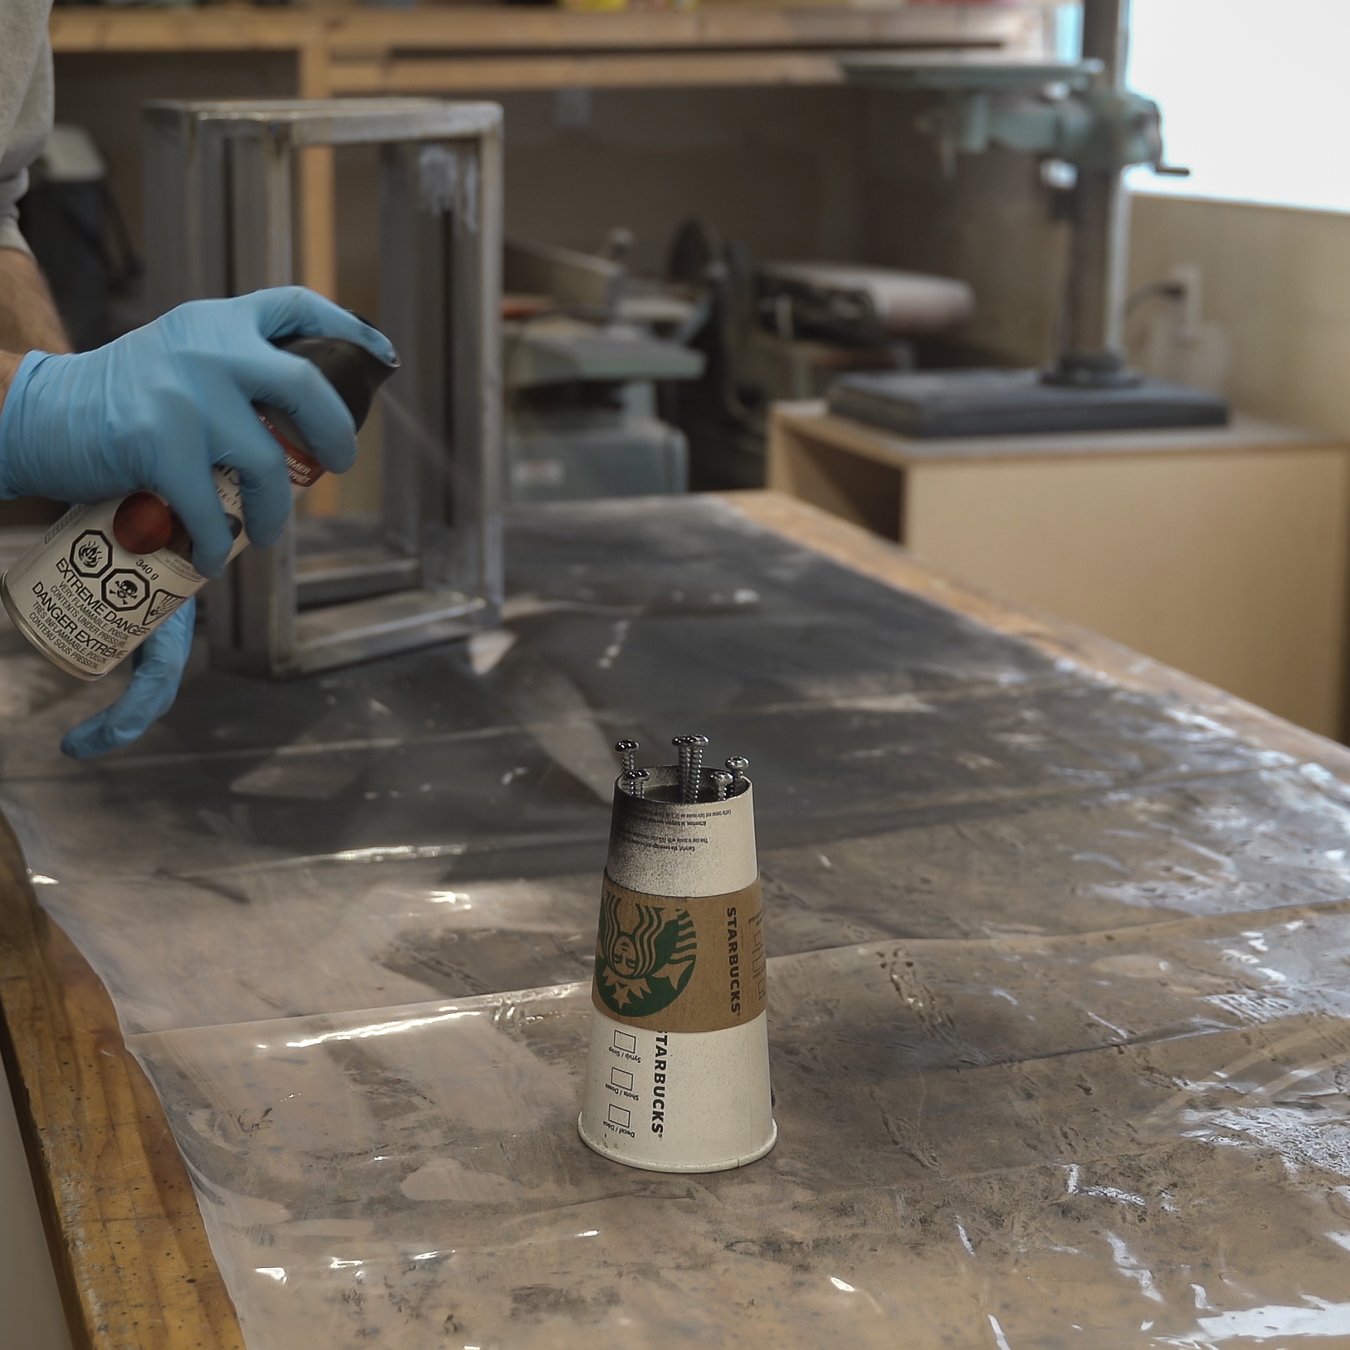
For the finish on this project, I chose the finest can of satin black spray paint that was available for less than $10. Only the best for my projects.
When I’m working with spray paint I like to do many thin coats. If you try and get full coverage on the first attempt you’re probably going to end up with a lot of drips. Just spray on a nice thin coat, let it dry, then do it few more times until you’ve got complete coverage.
Ideally, I would’ve had the legs powder coated, but that would’ve required driving somewhere, dropping them off, waiting a few days and then driving back to pick them back up. Alas, I’m a millennial and years of looking at my phone has ruined my ability to delay gratification. I want my black paint, and I want it now! So, the rattle can will have to do.

I couldn’t have the hardware I’m using on this project sticking out like a sore thumb, so I decided I would spray them black as well.
I struggled for a while to think of a good way to do this. Should I hold the screws between my fingers and then spray them individually? That didn’t seem like a great option. I would have to hold them until they were dry if I wanted a good finish.
That’s when I saw the perfect screw holder staring back at me from the garbage can. I grabbed this coffee cup, flipped it over, forced the screws into it and then I was ready to rock, errr, spray.
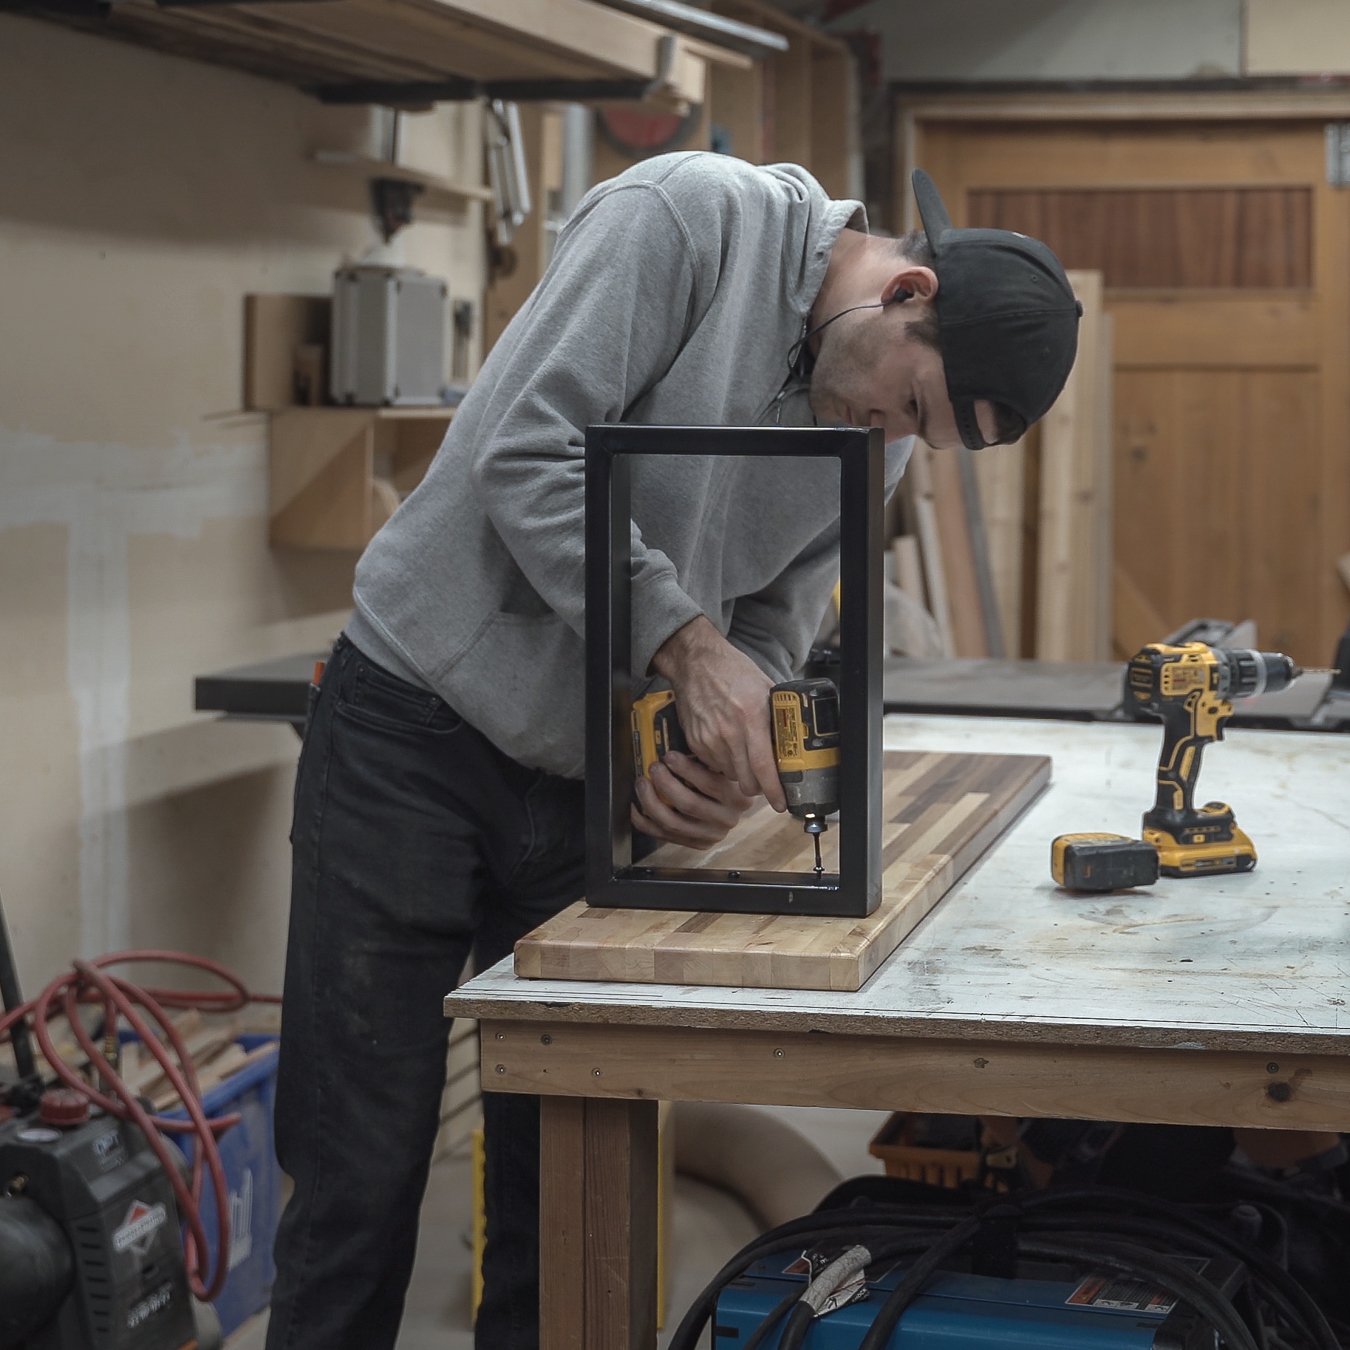
To secure the legs to the benchtop I went for the simplest method I could think of, just a few screws through the leg and up into the benchtop. Nothing fancy, but there’s beauty in simplicity.
The first step in the mounting process was tapping 3 holes in each leg. I used a cordless drill and a 3/16 drill bit to do it. Most people are surprised to learn how easy it is to drill holes in metal. The procedure is slightly different than wood though. First of all, you want to make sure your bit is sharp, none of those dull ones that have been rolling around in your drill case for years. Then set your drill for the lowest speed setting and apply a lot of pressure as you drill.
You want to always be removing a little bit of metal with each rotation. If your drill bit isn’t cutting the metal, slow down and apply more downward force. Every rotation that doesn’t cut any metal is dulling the blade. For thicker metal, you can add a couple of drops of cutting oil to help lubricate the bit and keep it cool.

After I tapped the whole it was a straight shot to the finish line. I grabbed my freshly painted screws and used an impact gun to drive them through the legs and into the bench top. Because I was screwing into relatively hard wood I made sure to pilot out all of my holes with a little 1/16 drill bit. It’s not uncommon to snap screws in half if you screw them into a hardwood without piloting the hole first.
If you’re following along at home, be sure to let the paint on the screw heads fully dry before you use them. Otherwise, the driver bit is likely to ruin your paint job.
Hey look at that, all done! I loaded the bench up into my truck and took it home so I could snap some photos!
Here we are, back at my place with the bench all set up and ready to be used! Who’s gonna give it a go first?!
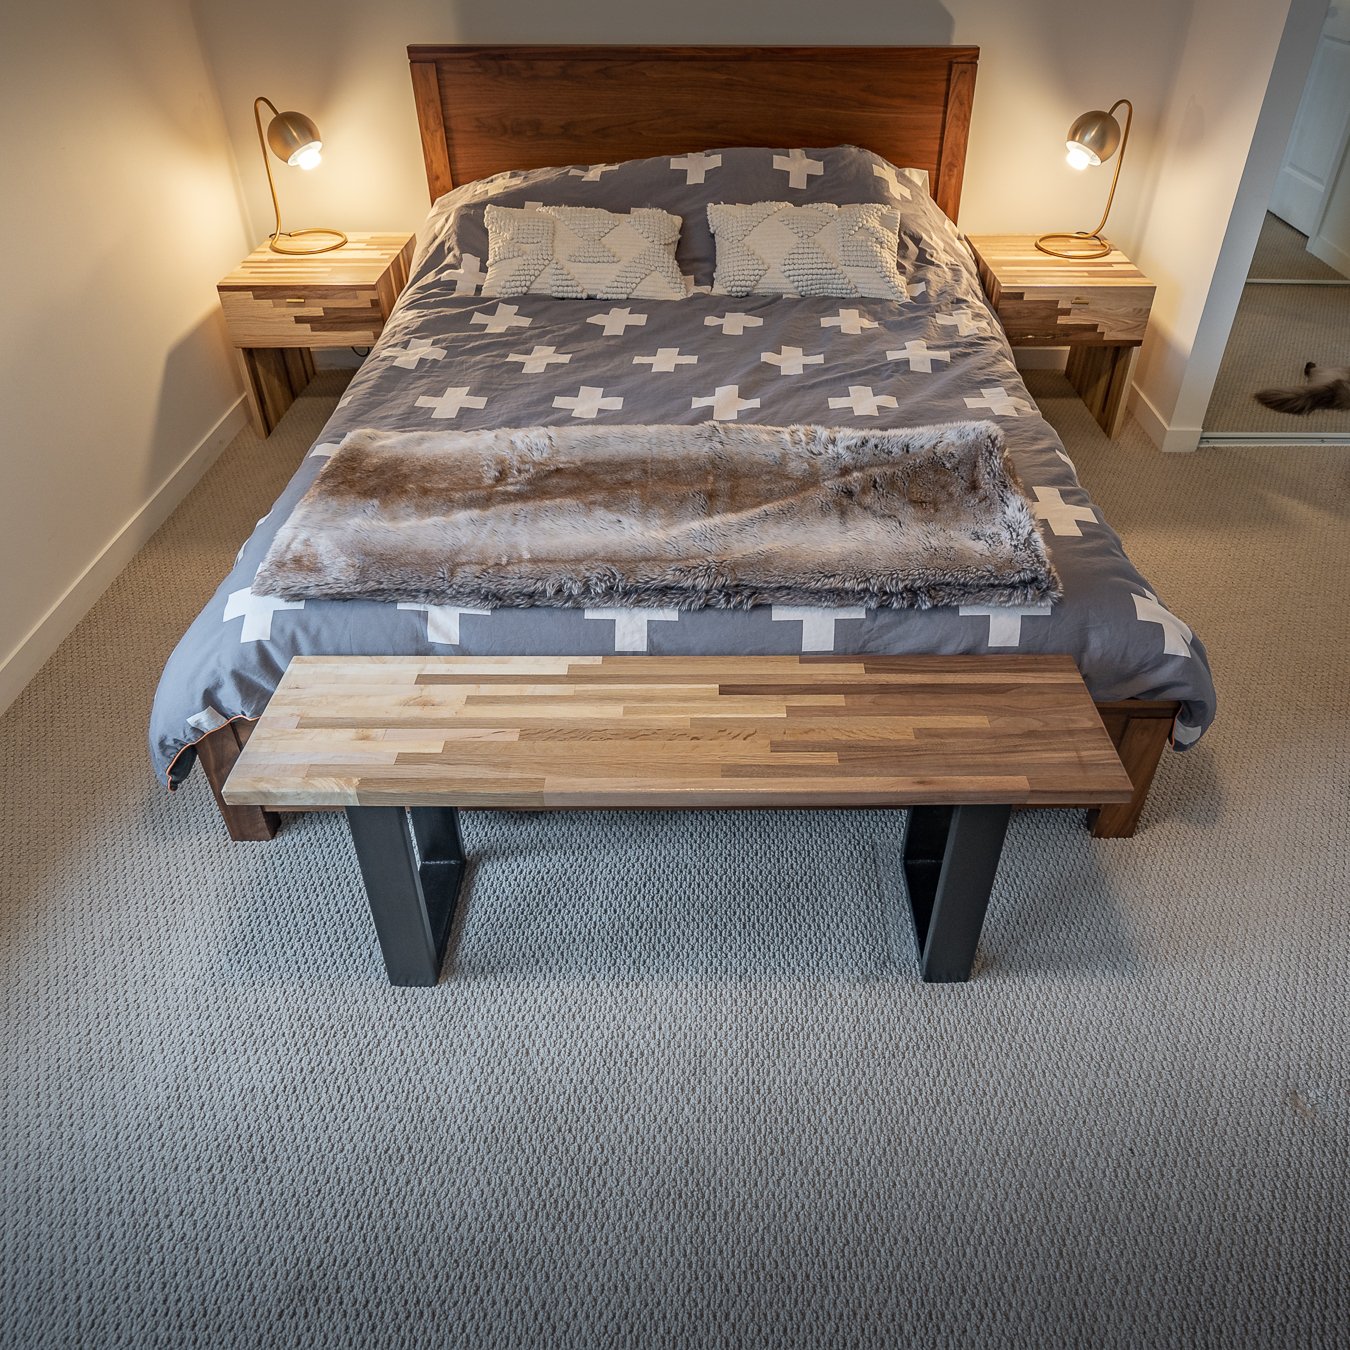
I’m not sure if it’s obvious or not from this photo but I’ve kind of got a thing for wood tones. Especially in my bedroom. I basically dream of wood tones all night long.

Here you can see my attempt at “setting” the photo. I wanted to convey this was a dressing bench, so I decided I’d scatter some clothes on it. It’s surprisingly hard to make a piece of furniture look “lived in” without making it also look cluttered.
It was either a shot like this or a shot of me half naked and half asleep trying to dress myself. So consider yourself lucky I went this route 🙂

I’m really happy with how this project turned out. It didn’t cost me much and it also didn’t take that much time. Which is incredibly rare for one of my projects. Usually they take me ages and cost a fortune.
Like I said in an earlier caption, I built this alongside another project, so it’s hard for me to say exactly how long it took me to build. But I’d ballpark it in the 10-12 hours range. Running two projects in parallel really added some economies of scales and helped speed things along. I’m going to do that more often in the future.

Alright everyone, that’s it for this post. Thank you for readin….
Huh? That tail, in the upper right-hand corner? Oh ya, how could I forget!
That’s Bing! The worlds cutest and cuddliest cat. If you’ve seen one of my posts before you’ve definitely seen Bing.
She’s really taken to sleeping on the bench and just generally treating it like her own personal jungle gym (much like she does with the rest of the house).

Alright, for real, that’s it. Thanks for checking out my build. Bless your heart if you made it this far in the post. Let me know if you have any comments or questions.
If you haven’t already please check me out on Instagram