Sophie’s Desk
You know that move guys do? The move where they forget their spouses birthday and in a last-ditch effort throw a gift together really quickly? Ya, this is nothing like that. I made this desk for my girlfriend’s 30th birthday and it was the result of a lot of planning and work in the months leading up to the big day. Don’t get me wrong, I’m totally the last minute gift type of guy. Just not this time.

Before we continue with the rest of the post can I do a quick plug for my social media? I can? Sweet, thank you!
Do you like DIY and woodworking content like this? If you do, I’d love it if you checked out my Instagram page. You can find me @zacbuilds on Instagram (direct link: https://www.instagram.com/zacbuilds/) I post all of my projects on Instagram along with any tips and trick I’ve learned along the way.

It’s a relatively simple design. A big flat work surface with a couple of large drawers for storage and organization. What it lacks in complexity, I hope it makes up for in style.
My girlfriend gave me a very short list of features she wanted. According to her, it had to have: storage, lighter wood tones, and hairpin legs. Outside of that, she left it almost entirely up to me. I did some quick SketchUp models, got her to sign off on this design and then set about making it a reality!
Let’s talk cost real quick. Everyone knows that the amount of money you’re willing to spend on someone’s birthday present is a direct measurement of how much you love them. The total cost of this project came out to a little less than $200, but that’s not an entirely realistic price because I already had a lot of the materials and got some for free (more on this later). If you wanted to replicate this project you’d have to spend close to $500.

The drawers are quite big and offer a lot of storage. They’re 24″ wide, 18″ deep and 5.5″ tall. The left drawer has become her electronics drawer. Laptop and camera gear all fit in here easily.
The right drawer is entirely devoted to makeup and cosmetics. Which wouldn’t have been my first choice if it was my desk, but hey, we’ve got different priorities.

Tired of all the staged shots and just want to know what the desk looks like completely naked? Here you go! Hopefully, this shot provides you with a better idea of what I was trying to do with the pattern. T
he lighter wood in the middle, which is maple, and the darker wood on the flanks, that’s ash. I tried to give the impression of a slow gradient fade from maple in the core to ash on the sides.
Let’s head over to my shop and I’ll show you how I built this thing.
The first step of this project was ripping a bunch of maple and ash 4/4 wood into 1″ wide strips. I started with 6 or 7 pieces of maple and ash that varied in width from 6″ to 8″. They were all about 6′ long.
Once I was done on the table saw I had about 40 six foot sticks of 1″x 1″ maple and ash.
I was surprised, all of the wood for this project only cost me ~$80 Canadian. Maple isn’t cheap, but ash is a much more affordable hardwood. If you’re looking to get into woodworking and are scared off by the crazy costs of the more exotic woods, ash is a great alternative. It’s like the Hyundai of hardwoods haha.

I grabbed all of my maple and ash sticks and then headed over to the chop saw (ya, I know it’s actually called a miter saw, but in my shop, it’s a chop saw). I cut them into 6″, 12″, 18″ and 24″ pieces.
See how I used painters tape to mark the different lengths there? Pretty smart right?! Alright, so it might not take a genius to figure out something like that, but it did save me quite a bit of time doing a bunch of repeated cuts. Instead of measuring each individual cut I just lined the wood up with tape mark and dropped the blade. Easy peasy.

Figuring out the pattern is my favorite part of any mosaic project. I take all the pieces of wood, lay them out on a big table and arrange them into what I think is a cool looking pattern. Whether or not I was successful is open to interpretation, but, at least I like the pattern I chose.
This is a totally unscientific process. I’d love to pretend that I have a grand plan I’m working to, but in reality, I semi-randomly place pieces down and shuffle them around until I like what I see. The only “plan” I had was that I wanted the middle to be the maple, and the two sides to be ash.

With my pattern locked in it was time to glue all those pieces together. This is my least favorite part of any mosaic project. Funny how my least favorite comes right after my favorite.
I’ve done projects similar to this in the past and forced myself to glue everything all at once in one big glue-up. It’s a stressful race against the clock, I have to apply glue to hundreds of pieces of wood, align them as perfectly as I can and then clamp everything together before the glue starts to dry (approximately 20 minutes).
For this project, I decided to change things up a bit. I was going to do my glue up in phases. People often ask me if this is possible because it would help to alleviate the time pressure. I’ve always answered that it would be, and it’s probably a smarter way to do it compared to my usual method. But I’ve never actually put it to the test. Until now.

I split the glue-up into three parts. Two halves of the desktop and one long skinny piece that would be the drawer fronts.
After applying half a bottle of carpenters glue to the first half of the desktop, I used a bunch of F-clamps to, well…. clamp everything together. Sorry guys, there are only so many woodworking verbs. Like I said before, usually, I push myself to do bigger glue-ups and I use big long bar clamps. Using these small F-clamps felt wrong in comparison.
Once the clamps were set on the first half I then repeated the gluing and clamping process for the other half and the drawer fronts. Easing the time constraint was really nice, I suspect I’ve probably added a few years back onto my life because of the reduced stress.

Despite my best efforts, there will always be some variation in the height of the individual pieces in a glue-up like this. Using my planer I was able to smooth out the halves of my desktop and the drawer fronts. The blades inside the planer remove thin layers from the highest points on whatever is fed through it. By repeatedly feeding wood through the planer and lowering the blades in small increments you can smooth out just about anything, 1/32 of an inch a time.
Another HUGE plus to doing my glue-up in multiple phases is that I could fit each of the intermediate pieces into my planer. My planer is 13″ wide, and the two halves of the desktop were 12″ wide, while the drawer fronts were only 8″ wide. They all fed through without issue. If I had done the desktop all as one piece I probably would’ve used a belt sander to remove all of the high points.
I’ve done it in the past, and it takes HOURS. Doing it this way was definitely a time saver.

After dozens of passes through the planer, I was ready to glue my two desktop halves together. The process here was basically the same as when it was hundreds of individual pieces, but now it’s just 2, much easier. I applied a thick bead of carpenters glue between the two pieces and clamped them together.
Once I had both pieces clamped together I also clamped the whole assembly down to my table. I know my work table is close to perfectly flat so it helps to prevent any bowing and warping that might occur to the desktop while the glue dries.
One of the best investments an amateur woodworker can make is simply a table that they know is nice and flat. It gives something you can clamp to, like I am here, that you know won’t warp, twist or bow whatever you are working on.
I also took a second here and used some maple coloured wood filler to fill any small gaps leftover after the glue-up process. I do my best to make sure all the joints are tight, but it’s inevitable that there will be some small gaps, especially around the butt joints where the end grains meet. Hehe butt joints…

Shhh don’t tell my other tools, but my track saw is definitely my favorite tool. It’s a circular saw that’s guided by a track so you get perfectly straight cuts every time. It’s almost like a portable, inverted table saw. Amazing, I love it.
Using it, I squared up the ends of the desktop. I could try and do my glue-ups with perfectly square ends, but its a lot harder than you might think at first blush. I prefer to just make my glue-ups a little longer than they need to be and then cut them square afterward.

Not only does the track saw make straight cuts, but it can also make straight cuts at a 45-degree angle. Again, like I said, my favorite tool.
In the first few pictures, you may have noticed that the grain on the top portion of the desk wrapped around and then down the sides of the desk. I like to call this a “waterfall” edge, though I’m sure there’s a more technical term out there for it. To achieve this look I had to “fold” the sides of the desktop down. That meant making two 45-degree cut across the width of the desk, cutting a triangular section out of the desktop.
That’s a little confusing, but take a look at the next picture and it should make more sense.

See what I mean here in the lower portion of the frame? Imagine a triangular prism inserted into that gap. That’s what I removed to achieve the “fold”. It’s a weird concept to try and articulate through text, but, hopefully, the pictures make it more clear.
I took this opportunity to give the whole desktop a good sanding. I started with 80 grit sandpaper on my random orbital sander and then slowly moved up to 220 grit. Most of my time was spent smoothing out the glue seam between the two halves of the desktop, but don’t worry, I left no grain unturned, errr, unsanded.

To help secure my 90 degree, waterfall corners I used a biscuit joiner.
A biscuit joiner cuts small pockets in wood that are perfect size for wooden “biscuits” (essentially elongated wood discs). You cut half of a pocket into one side of the corner and then a matching half pocket into the opposite side of the corner. The biscuit, along with a bunch of glue, then serves as the bridge between the two pockets, locking together your corner.
I lined up and cut 5 biscuit pockets on each side of the waterfall corner.

I covered the pockets, the biscuits and the entire corner in a ton of glue, this is no time to be stingy. I inserted a biscuit into each pocket and then pressed the two sides of the corner together. Rinse and repeat on the other side.
Not only do the biscuits help to strengthen the corner, but they also ensure alignment. If you’ve done everything right there’s a really satisfying click when you press the two sides together.

I rounded up all of my F-clamps and put them back to work. The clamps press the two sides of the corner together while the glue dries. I also added a couple of big long bar clamps to help stabilize the corner and keep everything square.
These waterfall corners always make me a bit nervous for some reason. I’ve done them a few times before, but I’m always worried something won’t fit, or line up, just right. So far, so good on this attempt though.
Once the clamps come off I’ll breathe a little easier.

Who needs yoga when you have a paint roller and a big long desk that needs to be clear coated!? That’s all the stretching I need 🙂
After the clamps came off it was time to do a bit of finishing work. I cleaned off any excess glue and then I rounded the corners off using my poor man’s router (my random orbital sander). After that, I was ready to apply a protective clear coat to the desktop.
I used a satin hybrid oil and latex floor varnish for the clear coat. It’s a tough finish, which is important because this desk is going to see a lot of wear and tear. I really like using satin finishes. They have a nice sheen to them but are much more forgiving of slight imperfections compared to a true gloss finish. Which is important to me, because ‘slight imperfection’ is my middle name.
Note to self: Applying clear coat is no substitute for proper stretching. I should stretch more.

I set the desktop aside and let the clear coat dry.
So far I’ve been working for 2 full days and all I have to show for it is the top half of the desk. Time to fill out the “guts” of the desk. I picked that term up from cabinet makers. They refer to the exterior of cabinets as the “carcass”, and anything inside the cabinets as the “guts”. It’s gross, but somehow also an apt description, so I use it a lot.
Ok, brace yourselves, this part is a little dry.
Lucky for me I had this sheet of 3/4″ MDF left over from a previous project. Using my table saw I cut it into 4 pieces.
The first piece was 22″ x 52″ and would become the bottom of the desk.
The next piece was 6″ x 50 1/2″ and would serve as the back of the desk.
The last two were 6″ x 18″, which I glued and screwed together to create a center support for the drawers.
Quick safety note: I should’ve been wearing a mask when cutting the MDF, the dust is pretty nasty stuff. Thankfully I do have a dust extractor hooked up to my table saw so that definitely helped to minimize my exposure. Do as I say, kids, not as I do.

I wanted the bottom of the desk to blend seamlessly into the hairpin legs. To achieve that look I had a custom semi-gloss paint mixed that matched the shade of white that the hairpin legs were powder coated with.
In a weird series of emails, I discovered that powder coaters are actually quite guarded about the specific colors they use. I asked the powder coater for the colour code of their white paint so I could get that matching paint made and they refused to give it to me. Instead, I had to wait for the legs to show up, take them to a paint store and have the paint store mix a custom white by eye to match the legs. Craziness.
This weird little quirk of the powder coating industry actually delayed the whole project by about a week. Oh well, what are you gonna do!

To attach the MDF back and center drawer mounts to the desktop I used a bunch of pocket screws. Pocket screws are a great option for concealed fasteners. I used a pocket hole jig from Kreg to make all of the holes. It’s not strictly necessary, but its a basically foolproof way to make perfect pocket holes quickly.
All of the pocket screws are concealed on the inside of the desk, so from the outside, the desk will look nice and sleek.
I screwed the back in first and then installed the center drawer mount by screwing it to both the desktop and the back. Screwing all of the individual pieces together like this should help to keep the whole desk nice and solid.

Did you think I was doing to mount the bottom next? Not quite. I’ll leave that off until I finish the drawers for ease of access.
I have a confession: I find it very stressful to mount drawers. It should be easy, I mean it’s not exactly rocket science. The problem is, drawer slides require extremely tight tolerances. You basically have to line everything up perfectly, or the drawers won’t function smoothly.
To ease my self into it, I started with the easiest part, mounting the drawer slides to the desk. You want to make sure the drawer slides are all mounted at the same height. A good foolproof way to do this is the cut a block, clamp it in position, place your drawer slides on top of the block and then screw it in place. Just like I’m doing in this photo.
Perhaps you’ve noticed I’m a big fan of “foolproof” methods of doing things. As a fool, it’s really the only way I can manage to get anything done 🙂

As I progressed through the drawers construction my stress levels started to rise in tandem with the level of precision necessary.
I started by cutting some ash down to 1″x4″ for use as the frame. I very carefully measured the distance between the pairs of drawers slides and set that as the width of my drawers. The level of precision necessary here is probably on the order of 1/32″. If your drawers are too big, or too small, there will be too much friction on the slides and they won’t close smoothly.
Once I was confident my measurements were correct I went ahead and screwed the frame together. 3 screws in each corner held everything together nicely. Remember to countersink your screws when you’re drilling near the end of a piece of wood, otherwise, you run the risk of splitting the wood. In fact, it’s a good practice to countersink any screw you’re putting into hardwood. If you don’t you might end up snapping the screw.

Test fitting the drawers was great, I didn’t swear at all 🙂
This was the most painstaking part. I’d fit the drawers, feel how they slid, and then if it wasn’t right I’d take everything apart and either shave this or shim that.
Eventually, though I got everything sliding nicely. Fun fact, the right side drawer is actually 1/16″ bigger than it’s left side counterpart.

While it’s nice that the drawer frames slid smoothly, they’re useless without bottoms. Let’s fix that.
I disassembled my drawer frames, took them over to the table saw and cut a 1/4″ x 1/4″ channel into them that I then slotted a piece of 1/4″ thick maple ply into. Bam! Bottoms. Their usefulness just increases by a few orders of magnitude. I buttoned everything back up and gave it a few applications of the same clearcoat I used on the desktop.
Again, luck was on my side, I already had the maple ply in my shop. I was originally planning on making the drawer bottoms out of something much more pedestrian like painted hardboard, but this is much nicer.

With the drawers finally sorted I was ready to attach the bottom. I countersank a bunch of screw holes and used 15 or so #8 1 1/2″ screws to secure the bottom in place.

In the interest of brevity, I haven’t really shown much of the drawer fronts so far. I made, planed, sanded and clear coated them in parallel with the desktop. They’ve been behind the scenes for a while now, but it’s time for them to make their big debut!
Like the desktop, I made the drawer fronts in one big long piece. Obviously, that wouldn’t work very well for a 2 drawer desk though. I had to cut my solid drawer front in half! The mouth of the desk measured 50 1/2″, I subtracted 1/4″ for clearance on both sides and then split that in half (25 1/8″).

Whats a drawer without a drawer pull? Really annoying to open, that’s what! Haha I crack myself up.
To make the contents of drawers easier to access I needed to install some drawer pull on the drawer fronts. This meant tapping a couple of holes in them. I grabbed my drill, a 3/16 drill bit and got down to work.
That piece of tape on the drawer front serves two purposes. One, it let me draw on the face of the drawer front so I could mark the hole location without permanently marking it. Two, it helps give a nice clean cut to the drill bit. I don’t pretend to understand the physics at work here, but I always find holes drilled through tape are always turn out cleaner than the ones without.
I placed a scrap piece of ash underneath the drawer front for a similar reason. Drilling into a scrap piece of wood keeps the drill bit from “blowing out” the back side. Again giving a much cleaner hole.

Installing drawers fronts into a desk like this is a little bit tricky. You want to have even gaps the whole way around the desk, and figuring this out requires the drawers to be closed. But when the drawers are closed you’ve got no way to screw the drawer fronts to the drawers. It’s a catch 22.
Enter a product called “no more nails”. It’s a rapid drying construction adhesive. I applied a couple of dollops to the front of each drawer, put my drawer fronts in place, adjusted them until I had an even gap the whole way around and then waited for the glue to dry.
I wish I could remember where I picked up this trick, but I can’t. I think I’ve seen it done with silicone too, but for my money, the no more nails dries faster and holds a bit better.
Once the glue sets, I’ll open the drawers and screw them to the drawer fronts to give a more permanent and secure connection.

If you look real close you can see 1/8″ plastic shims I used to position the drawer fronts in the mouth of the desk. Once I was satisfied with their position I let them sit overnight so the glue could dry and I could get some rest.

Or at least I thought that’s what the plan was.
The glue had a little longer to dry than I initially thought. This project actually sat uncompleted for a week while I waited for these hairpin legs to show up. I can’t complain though, the legs were supplied to me by Hairpin Leg Shop. They really liked my work and wanted to be part of one of my builds.
This is kind of a big deal for me. I’ve spent a lot of time making and sharing my work online. It’s been incredibly rewarding and I’ve connected with people all over the world which, frankly, is just insane! But, there’s also been a real financial cost to it, I’ve done dozens of projects and paid for all of the materials out of my own pocket. It was really nice to have a business reach out and help to relieve some of the costs of doing this project. If I can find more partners like this in the future I’ll be able to create even more content and hopefully connect with even more people.
Anyways enough gabbing about me, let’s get back to work. No fancy mounting system here, I just screwed the legs directly to the bottom of the desk with some #10 3/4″ pan head screws. The hairpin legs came pre-drilled with a bunch of mounting holes.

This is going to be a working desk, but I want it to stay looking clean without a bunch of wires cluttering it up. To that end, I mounted a power strip on the backside of the desk and cut a couple of pass-through holes. That way my girlfriend can hook up her computer and any chargers she wants, without having to run the cords down to the wall outlet. She can also charge things even while they are concealed in the drawers.
I made sure that power strip I picked up had 4 USB ports for all of her USB charging devices as well.
If you ever come to my house you’ll find a lot of hidden power bars like this. I hate staring at wires and will go to great lengths to hide them haha.
After that, I did a little bit of touchup painting, loaded it up into my truck and took it home.
 This good enough mug has always made me chuckle. I always feel like I’m pulled between a “good enough” attitude and perfectionism when I’m doing these projects. On one hand, I want to create things that are both nice to look at and functional, and to do that requires a certain amount of perfectionism. This desk wouldn’t be very good desk if the drawers didn’t work, right? There will always be some flaws in a project like this, and as the guy who built it, I know ALL OF THEM, intimately. It’s hard for my eyes not to go right to them when I’m looking at it.
On the other hand, you have to step back and say enough is enough at a certain point. I must have done 4-5 applications of clearcoat on this desk before I got one that I was happy with, and even at that it still wasn’t perfect. It was “good enough” that no one other than me would notice the imperfections unless they were inspecting it with a magnifying glass.
Knowing where that good enough point is can be tricky, if you’re too lax with your standards and build a bunch of crap no one is going to like it. But if you’re too much of a perfectionist you’ll never put out any work for people to enjoy. I think it’s all about living in that weird gray area between the two. Embrace the grey area.

The drawers might have been a pain in the ass to do, but man I do love the look of them.
The drawers are soft-close/self-closing. If this isn’t something you ever experienced you should run out to your nearest hardware store and give it a whirl. So long as you get the drawers 80% of the way closed a mechanism inside the drawer slide will do the rest of the work for you. Ensuring that you never have to suffer the indignity of an almost closed drawer again.
The drawer slides also make it impossible to accidentally (or intentionally haha) slam the drawers closed. Which is important if you’ve got something delicate and valuable in the drawer, like say a camera or a laptop.

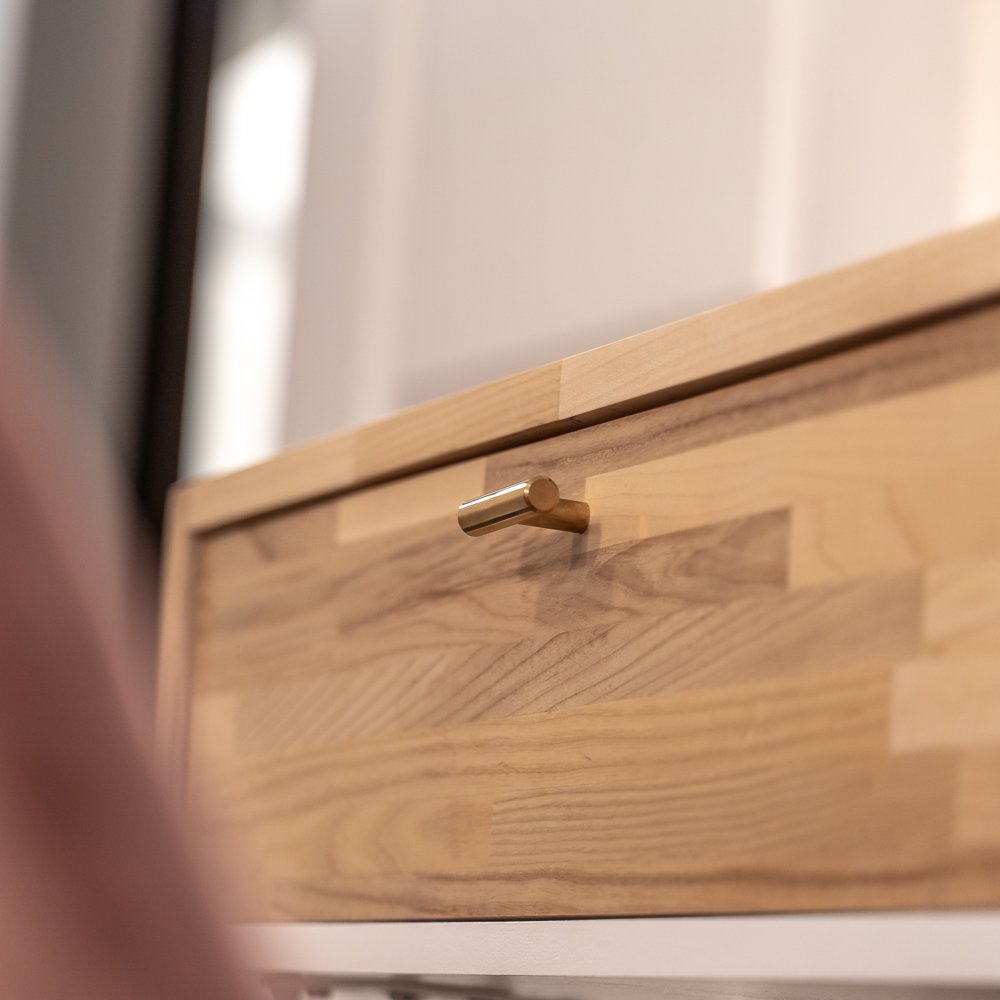
I chose these little golden T-shaped drawer pulls for this project because I’ve used them in a number of other places throughout our house. Our nightstands, and the storage chest to the right of the desk, have the same pulls. It helps to tie everything together.
Plus I bought a 20 pack of them off of Amazon, so I already had a bunch.
They say when you take photos of things from below, looking up, that it makes them look more powerful and imposing.
Is it working?

How many layers of clear coat is the right amount? Good question!
It depends what you’re going for. The more layers you apply, the less of the texture of the wood will show through. For me, 3-5 coats is normally a nice middle ground. You’ve got a good thick layer of protection, but you also still have the grain of the underlying wood showing through.
I mean c’mon, when the light hits the zebra stripes in this ash just right, it looks pretty sweet! I couldn’t cover that up.

I have no idea what happened here. It looks like I joined two completely different pieces of wood on this corner. Trust me though, its the same piece of wood. You can see it pretty clearly in some of the other pictures. The only explanation I can think of is that the grain of the wood must have changed very quickly in the small section I cut out.
It looks kind of like a mistake, but I like it anyways. Little things like this add character.

These hairpin legs are great. The powder coat finish on them is great too. I think the third prong helps set them apart from most of the hairpin legs out there.
It was a pleasure to work with the Hairpin Leg Shop on this build. I can thoroughly vouch for their product. If you end up ordering anything from them, tell them Zac sent you!

Oh shit! It’s Bing, and she’s here to claim the desk as her own territory! Just look at that face, you can tell she means business. You don’t get a collar like that without making a few enemies along the way.

She made a bunch of references to me paying “cat tax” with the desk and then told me to get that damn camera out of her face.
This is the last shot I got before things got physical.

Hahaha alright everybody, thanks for checking out my build! Let me know if you have any questions or comments below and I’ll do my best to answer them all!
Oh ya! and check me, and all of my other projects, out on Instagram, you won’t regret it! Peace!