Ring Doorbell Install Guide
Oh boy! New smart home toy to play with! Today I’m going to be showing you how I install this Ring Doorbell. I’ll go over a couple of my initial impressions of it and then after I’ve been using it for a while I’ll do a complete review.
So I bought this doorbell during Amazons black Friday deal, but it was back ordered so I only got it recently. I paid $129 CAD, which I thought was a pretty good price. This is a Ring 1, there’s also a Ring Pro, and Ring 2 available, but as near as I can tell the only real benefits they offer over the Ring 1 is a 1080p video and for my uses I feel like the 720p video stream the Ring 1 offers is plenty.

Amazon lost a couple of points in my book by shipping me a Ring with a box that had already been opened. Oh well everything is still inside and it seems to be functional. So I won’t worry about it to much. They’re pretty good about taking returns. Let’s “unbox” this thing and see what we’re working with.

So the Ring actually comes with quite a few things in the box. I was surprised, I that they included some tools necessary for the installation. Usually you get a couple of screws and a good luck pat on the butt from manufacturers, not with the Ring though. Inside the Ring’s box you get the Ring itself, a mounting plate with a built in level, a combination screw driver with 2 heads, some masonry plugs, a masonry drill bit, a diode (more on this later), some instructions and a USB charging cable.

I really like the way the ring looks. It’s heavy in the hand, the bottom half of the ring is made of actual metal, and not just plastic painted to look like metal. The build quality seems to be pretty nice except for one oddity. Something inside my ring, I suspect the battery, is loose. I can shake the Ring and feel something in there sliding around, and not just a little bit, it’s really moving around in there. Once the Ring is mounted, it’s not like it’s going to be moving around, but still it doesn’t inspire confidence. I’m not sure why Ring didn’t fix the battery in place, it seems like an odd choice the detracts from an otherwise very solid device.

Here the back of the Ring and the mounting plate. At first glance this might look a little intimidating, but don’t worry we’re gonna get through this. Let’s start with the Ring itself, on it’s backside you’ll find 3 points of interest. First is the power switch, that bright orange button. You probably know the drill here, press the button and the Ring spring to life. You’ll also use this button while pairing the Ring with your phone and wifi network. Start by downloading the app, and then follow the on-screen instructions. It’s dead easy and takes a couple of minutes at most. Although, word to the wise, the Ring works using a 2.4Ghz wifi signal only, 5ghz is not supported.
Next you’ve got the charging contacts. These are for supplying the Ring with a trickle charge from your hard wired doorbell connection. If you don’t have a hard wired doorbell that’s ok the Ring will still work just fine for you, but you may have to take it off the wall a few times a year to charge it. Speaking of charging it, that’s what the micro USB cable port on the back of the Ring is for.
The mounting plate is a little simpler. There are two points where you attach the wires from your hard wired door bell (should you have one) and then some contact pads where that charge is then passed to the Ring.

Here’s my current doorbell. Pretty basic. Press the button and a chime inside the house rings.
Now it’s time for the electrical safety talk. Before proceeding any further, I went to my breaker panel and looked for breakers labeled doorbell, front door, or anything similar. Because my house is old and was wired by an incompetent electrician nothing is labeled. So I just turned off everything. Doorbells GENERALLY operate at very low voltages, so it’s unlikely I would’ve shocked myself, but you never really know until you get zapped, so play it safe and turn off the power!
Ok now that we know we’re safe let’s strip it apart and see what we’re working with.

I pried the cover off with a flat head screw drivers and then undid the two screws that were holding the doorbell to my door frame. Inside, underneath all of that grime, you can see there are two wires, a white and black wire that are coiled around 2 screws that secure them in place. This is a pretty common setup.

I undid the two screws that are holding the wires in place. I also noted the lack of a diode. Because my current doorbell doesn’t use a diode, I don’t have to install the one that came with the Ring.

Next I pulled the wires through the back of the backplate and attached them to the mounting points. Attaching to the mounting points is pretty easy. I loosened the screws using the included screw driver. Then I bent the tips of the wires into a hook shape, wrapped them around the screws and tightened them down again. The hook keeps the wires in place and keeps them from slipping out as you tighten down the screws. The black wire of the left and white wire on the right. Easy peasy.

That’s it for wiring! I’m basically a master electrician now!

Next I used my impact gun to secure the back plate to my door frame. Because my door frame is made of a wood this was pretty easy. I simply screwed the four supplied wood screws through the holes in the back plate and into the wood door frame. The only real consideration here was making sure that my back plate was level before tightening down the screws.

I’m so close now I can practically feel my house’s IQ rising.

Time to attach the Ring to the back plate. I came it from above and slowly slide it onto the mounting plate. There was a satisfying click when it was locked into place. But wait, if it’s so easy to mount on the backplate, what’s keeping someone from walking up and stealing it. Good question dear reader.

There are two screws on the bottom of the Ring that use a special security head. Once the ring is attached to the back plate you tighten down these security screws and it can’t be removed from the back plate. Is it a perfect solution? Not really. Anyone can buy a security screw driver, but I’m sure it will dissuade 90% of would be thieves. If you live in an area with a lot of crime, the Ring doorbell may not be for you.
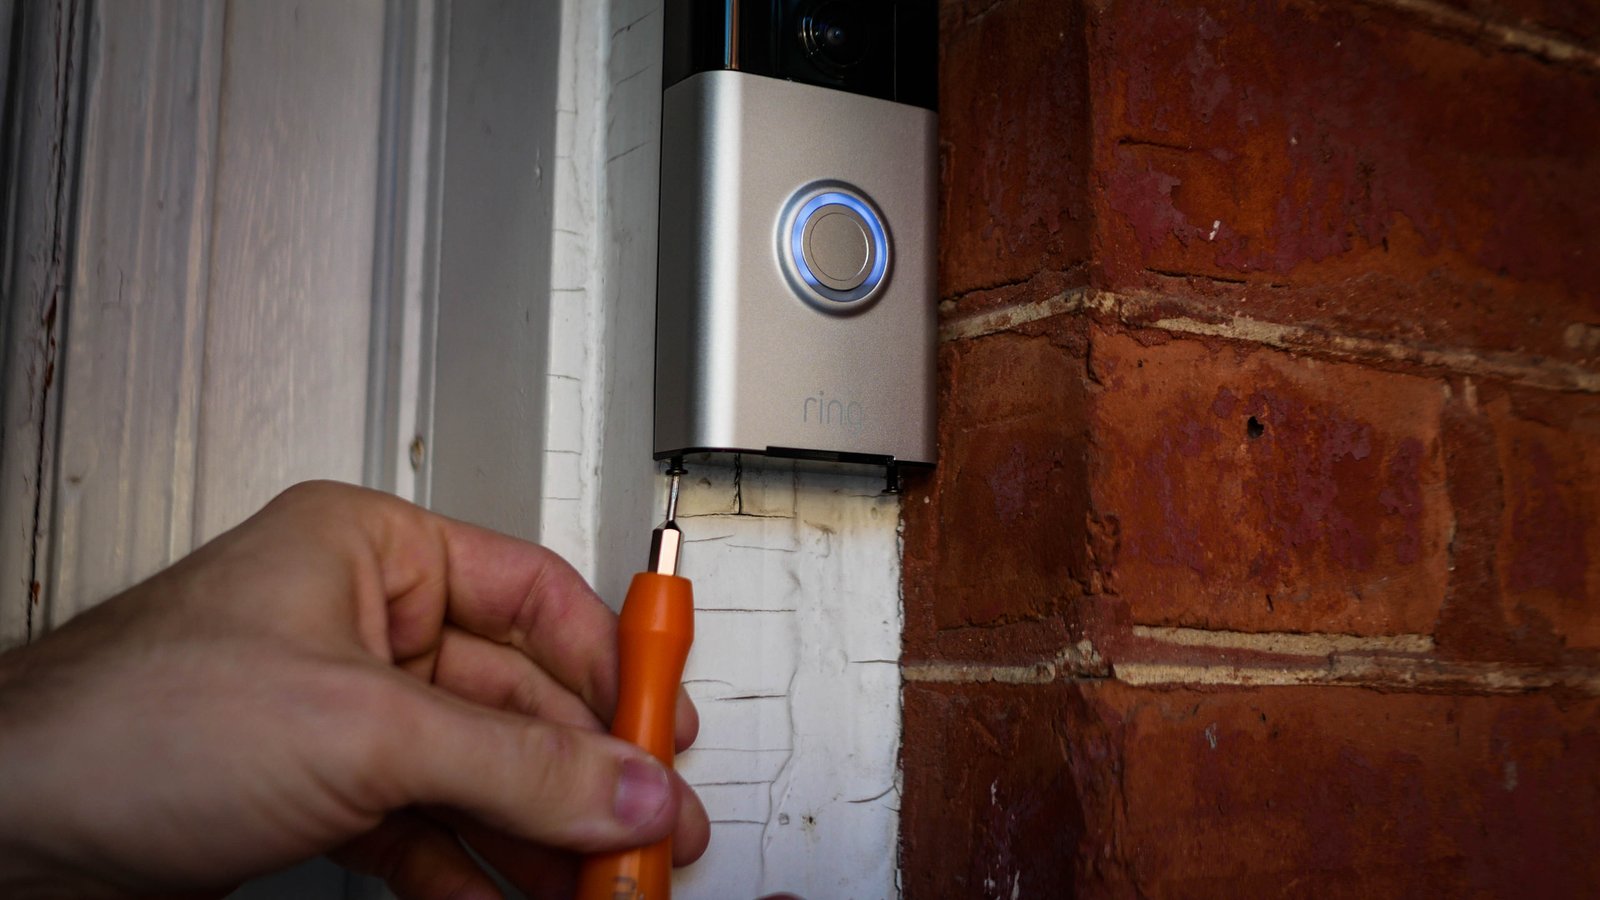
Obviously one of these security bits is included with the Ring. I put it into the supplied screw driver and tightened down those security screws. I made sure I kept the security bit somewhere safe after I was done with installation in case I ever needed to remove the Ring.
Ok let’s test this thing out!

Hey, it works! That wasn’t too bad. I think in total it took me about an hour to do, and most of that was taking pictures.
So the installation process was pretty, but how is the Ring as an actual doorbell? Should you buy one for yourself? I’m still working on that part of the story. Stay tuned for more.