Ok so this is a project I did back in the spring, I know it doesn’t exactly align with the current season and I apologize for that. Bookmark the page and come back to it next spring though. Who knows, maybe some of my readers are lucky enough to live in places where winter isn’t really a thing, good for you guys.
This project was part of a bigger ongoing project to revitalize my roof top deck. I have a deck off of my bedroom and calling it sparse would be generous. These planter boxes were step 1 in transforming it into a real outdoor living space.
As all good projects do, this one started in the shop after a quick run to one of my local home improvement stores (I don’t remember which one, but if home depot wants to send me a cheque it can be home depot.) This is everything I used to make 1 of the boxes.
I used brown pressure treated wood for everything. I’m not a huge fan of cedar and honestly I don’t mind the look of brown pressure treated lumber. 4 – 2 x 4, 18 – 1 x 6 x 5, one small roll of landscaping fabric and some deck screws. Total cost was about ~90CAD for two boxes.

First thing was first. I cut everything I was going to need off the bat to streamline the assembly process. I actually documented the second planter box I made so I had the benefit of hindsight while making this one.

Now it’s time to cut some landscaping fabric. I used two 5 foot pieces per planter.

I used the landscaping fabric to line the planter boxes. I was slightly skeptical of using it like this, but I helped a friend build some planter boxes last summer and we used the same technique. Those boxes are still looking good after a few seasons so I figured why not.

Assembly time! Start screwing everything together. I accidentally ran out of brown pressure treated wood, but I had some green stuff kicking around so I used that. Remember what I said before about buying extra? Ya, do as I say, not as I do.

Starting to form into something resembling a planter box frame.

Hurray! I built a cube out of wood! Also I thought I took picture of this but I didnt, so for the next few images we’re going to switch to screen grabs from a video I filmed of the process. Sorry for the crappy quality.

Here’s what the frame of the planter looks like. We’ll be attaching everything else to this.

I screwed some 1×6’s to bottom to support the bulk of the soil weight in the planter. I left gaps between them to allow water to drain through.

To attach the landscaping fabric to the planter box I used a manual staple gun and some 3/8 staples.

Adding the second layer of landscaping fabric here.

Again, sorry for the low quality pics. But it should look something like this once the landscaping fabric is installed.

Not the neatest job, but don’t worry, no one will ever see it.

I mitered some 2x4s into a rim for the planter. This will sit ontop of the frame and clamp down on the landscaping fabric.

Now I get to cover up my messy landscaping fabric installation by installing the rim on the frame of the planter. Try and center the rim as best as possible.

Ok now it’s time to clad the outside of the box. I put the box on its side, on the ground to make it a little easier to work.

A better carpenter might have measured the spaces between the boards. I just eyeballed them.

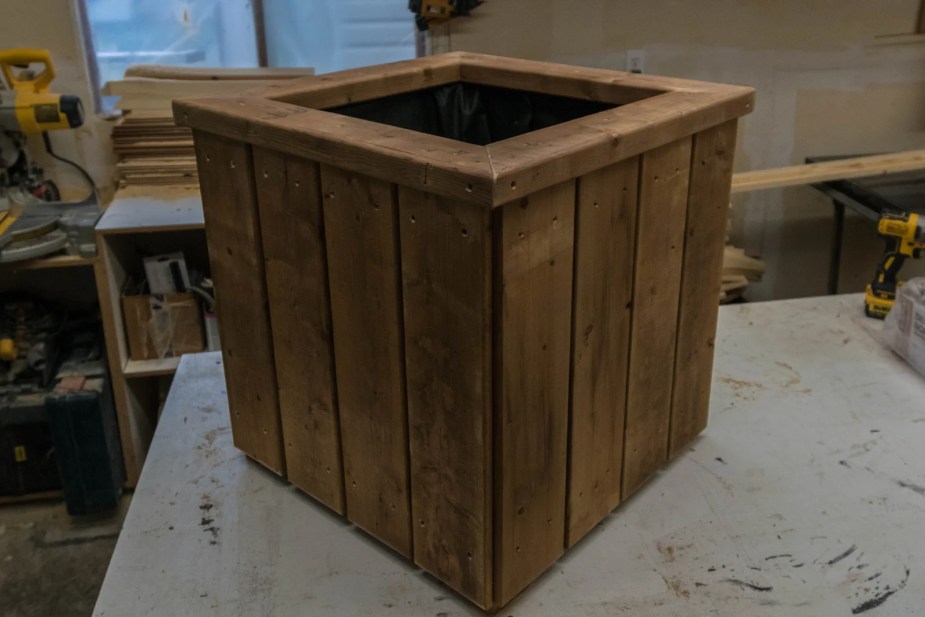
After it was all cladded this is what it looked like. Not bad. Simple and functional.
So here the boxes are loaded up and ready to go home. These things were pretty heavy, I may have over built them a little bit, but I’d rather over build anything that is going to be outside year round. It’s just a good policy that ensure longevity.

Once I got them home and lugged them up 3 flights of stairs this is what they looked like.

Stayed tuned, I’ll be uploading the rest of my deck project soon. It gets a lot more interesting I promise!
Questions? Leave ’em in the comments!
[…] If you’re interested at all in the planter boxes that are flanking the bench here’s my tutorial on how to build those! […]
[…] If you like the other bench and the planters remember I have guides on how I made those too! Planters […]
[…] hand krieg jig. I pre-drilled the holes with a counter sinking bit. I’ve covered all this in every other part of this build so I’ll skip the detail […]